
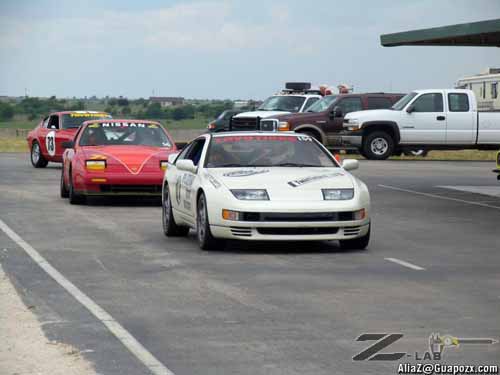
Z-Lab was originally intended to be a show car by the prior owner, but had a blown engine. The project never got started and the car sat in a garage for a few years. I bought Z-Lab to be my new project car, but my intentions for it are significantly different. Z-Lab is a purpose built documentation/test bed. The primary focus of the car is stress testing by road racing; high speed open road racing and circuit racing. Program work will be documented to help other people working with similar components/problems. Z-Lab is part of the TwinTurbo.NETwork, members from the site are helping with design, labor & support of this project. Vendors are also being inquired of for sponsorships.
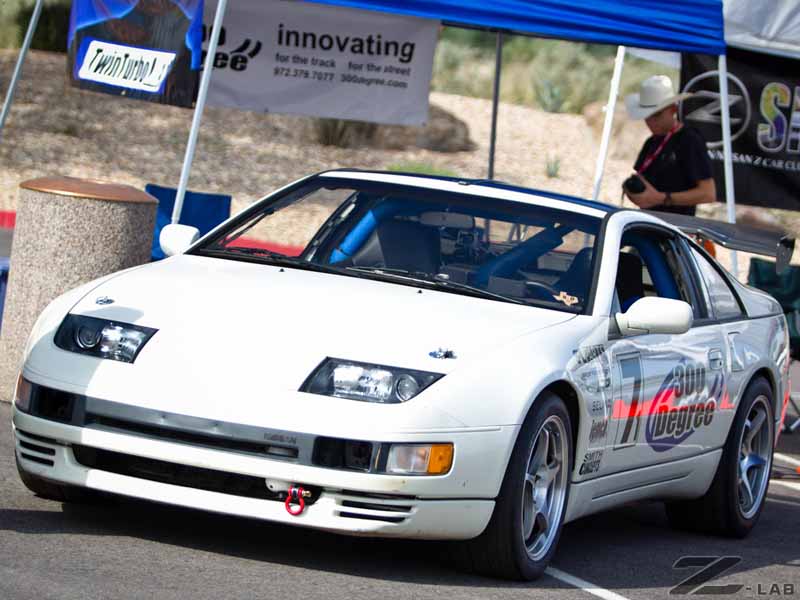
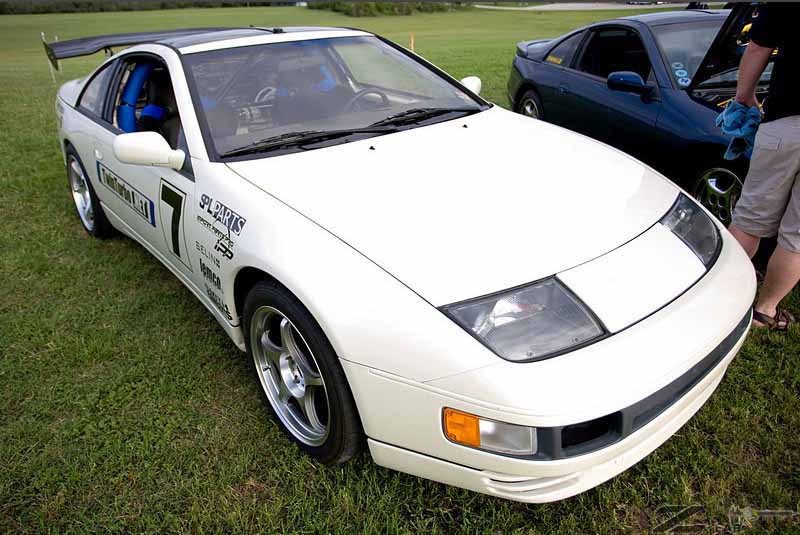
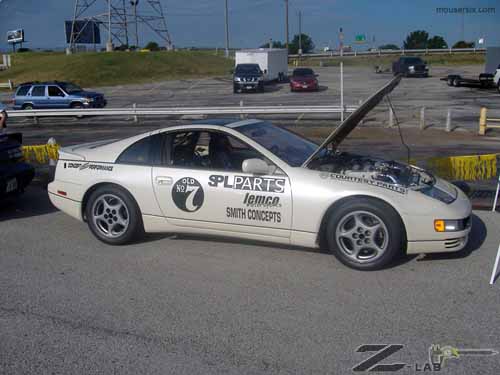
Z-Lab is a 1990 300ZX Twinturbo 5spd with 96k miles on the odometer originally. The body is clean and straight with the exception of an odd large dent on the inside of the passenger fender. The original owner had blown the engine, the prior owner bought a second complete engine and it was part of the deal when I bought it as well as a pile of other extra parts.
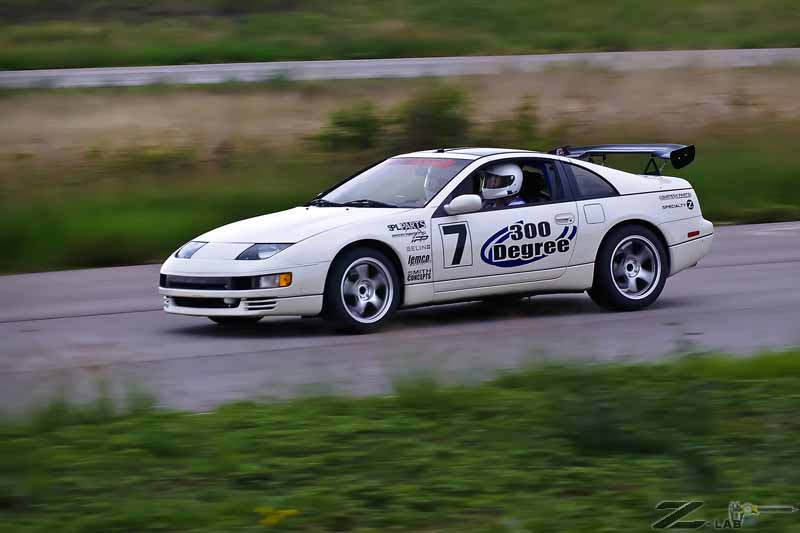
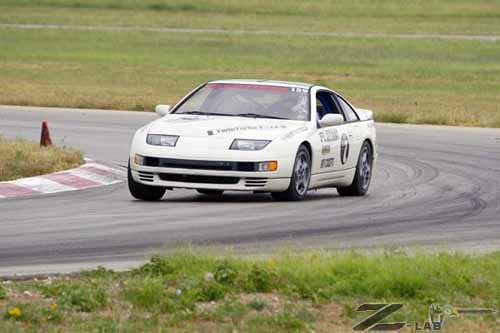
The short term plan for Z-Lab was to strip it down, remove unneeded components (interior, HICAS, etc) & clean everything. Then rebuild the engine using stockish parts to 300+RWHP, install a roll bar, harnesses, race seats, improve the brakes and improve the suspension. This is completed, now the testing and upgrades have begun to bring Z-Lab from phase I - get it on the track to phase II - complete the car's build (full cage, fire suppression, etc). During this process I will spend time updating existing documentation I've written over the years where necessary.
Nothing on the radar for Z-Lab events at the end of the season.
Z-Lab is sponsored by:


Updates:
1-5-16
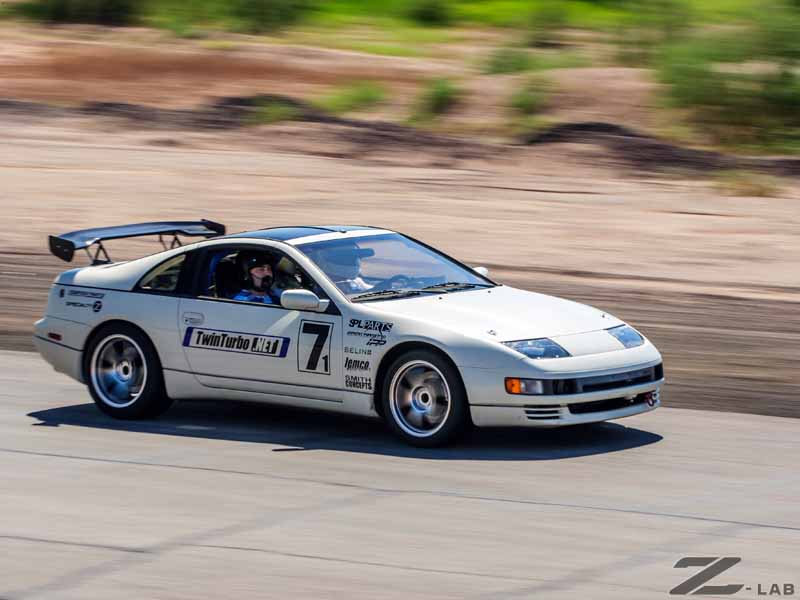
A few in car videos from last year. I bought a GOPRO HERO3 and an external mic that I finally got all sorted out to get good in car video and audio without a bunch of wind noise, etc. Took a bit of moving things around but ended up with the mic positioned in the inside of the trunk near where the exhaust comes out to get engine sounds without all the wind noise.
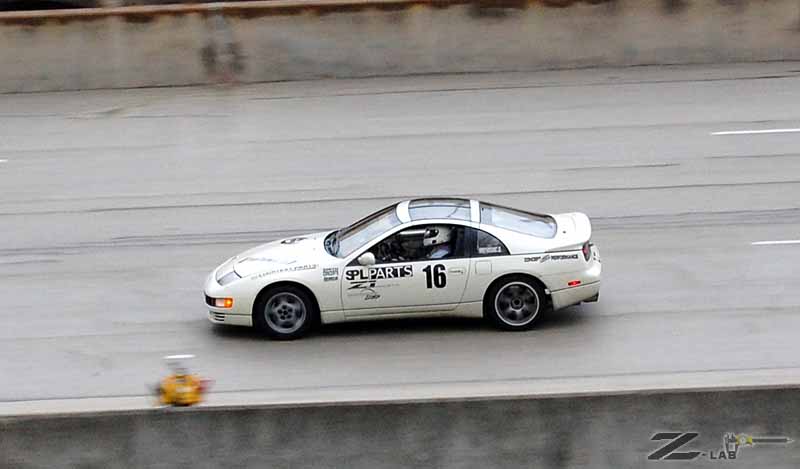
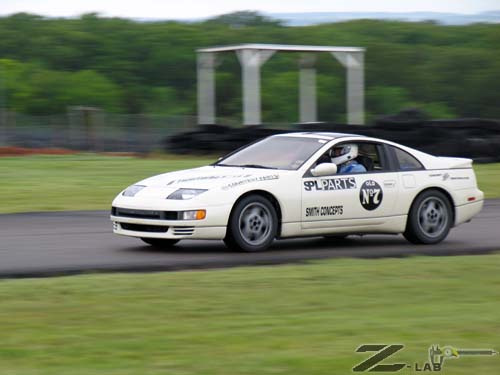
Circuit of the Americas
Running in 'Blue' group with Driver's Edge. All participants were Yellow and faster, just categorized with regular weekend colors.
This was my fastest lap (probably the only clean air lap) of the first ever day on the track @ 02:40 during my 3rd session. I don't have video of the second day where my line improved and I had a couple 2:40s in traffic with theoretical best time of 2:38. I don't feel too bad about this for an intro to COTA for myself.
Driveway Austin
Unfortunately rainy morning and rained out afternoon sessions. This is the best lap from my only complete session at speed. Sorry the audio is garbage.
Memphis International Raceway
Fastest lap of the day was in the last session. Basically private lapping with no traffic at all. 1:17.88. Dropping too much speed into the carousel at the end of the strip and a little clumsy on the entrance to the 'M' compared to later laps. Once the car heated up I turned the rest of the laps within .5 seconds of each other @ 1:18.
Eagles Canyon
Shake out session at home track prepping for TWS weekend
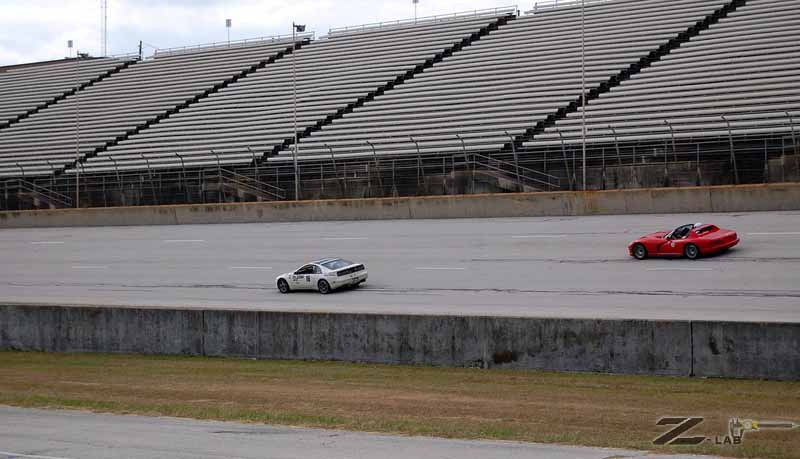
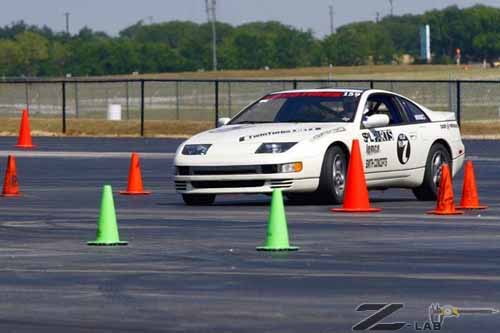
Texas World Speedway
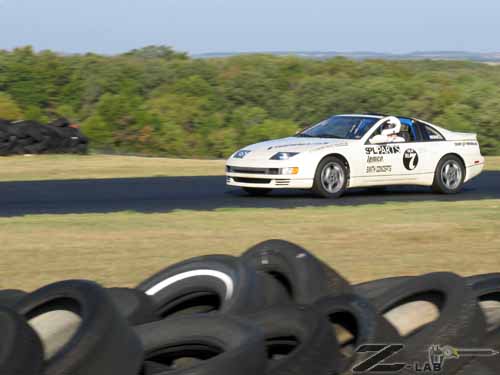
Fastest lap of Saturday. Noticed cracks in the front rotors by the end of the day and wouldn't run on Sunday. First time I've been to TWS that it was not a bajillion degrees or rained. So, I was not happy about having to miss a second nice day of track time... unfortunately, probably the last time since the track is slated to close soon.
Finally decided to turn on the boost controller. Made the rear end a bit happy on track out. Sometimes I could use it to my advantage to rotate the car, sometimes it made the wall get a little closer than I cared for.
Running V2 of the Accusump controller in this video (on top of the dash).
Lap 2 was the fastest of the day at 2:02.38 on Traqmate
12-5-2013
Not sure how to catch up, it's been 3 years since the last update. The main reason I don't update more often is 300 Degree (my Z related company) has put a lot of time and money into Z-Lab for testing possible new products over the course of the build. A lot of things get tried out and while they might solve a problem or enhance performance the end result isn't a mass produceable (applicable) product or a better way to do the same thing is sorted out and hasn't seen production yet. Outside of this, Z-Lab has been out to Phoenix for ZCON 2012 and member shake-down days at ECR working on these new items.
So, here is what's new mods wise and whatnot on Z-Lab that hasn't been discussed here and probably isn't going to make it to production for 300 Degree unless I get some feedback from here about it. If you are interested in any of this stuff, I generally have 2-3 units made so I might have leftovers to sell. These are listed in relative order of installation/modification and some where seen as far back as ZCON in San Antonio in 2009.
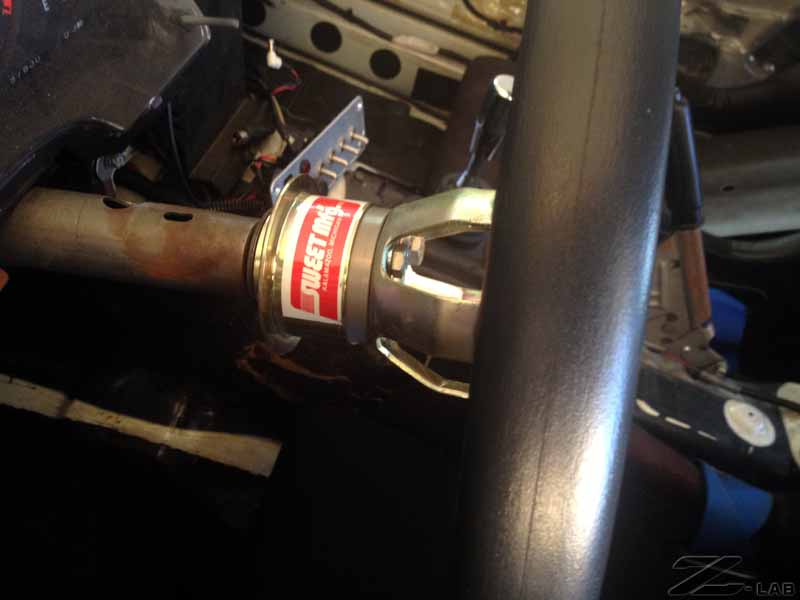
Sweet Manufacturing removeable steering wheel - Needed this to get in and out of the car since there is no tilt wheel and I don't want to adjust the SPL carbon racing seat constantly.
Fuel Starvation Solution - This is extremely simple and effective, but requires a bit too much modification for the average weekend warrior that suffers from fuel starvation. The aux tank goes under the main tank and feeds back up to the OEM fuel pump location inside the tank. The little tank is almost a gallon and tucks neatly up into the floor panel above the lowest points of the car. As mentioned before I probably ran this down to < 2 gallons of gas and kept the pickup submerged.
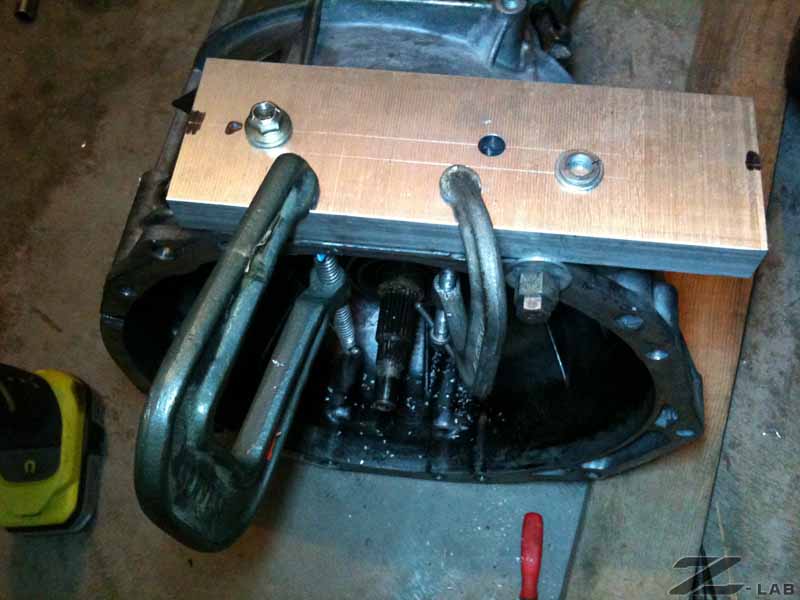
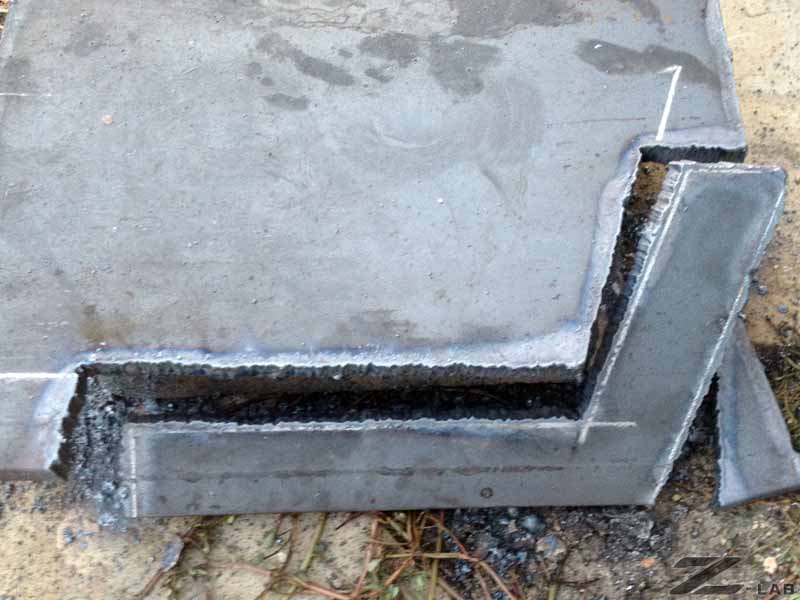
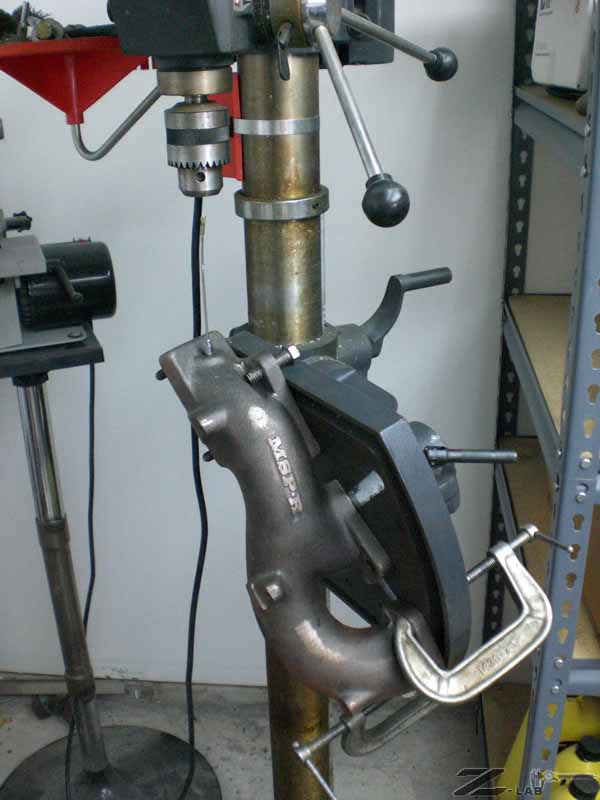
Transmission Repair - Somehow I managed to completely F up the threads for the starter on the transmission. Not a helicoil repair. I had to go all the way to keenserts. Here's the drill block I made to get the hole straight for the keensert. Thing will definitely not fail now.
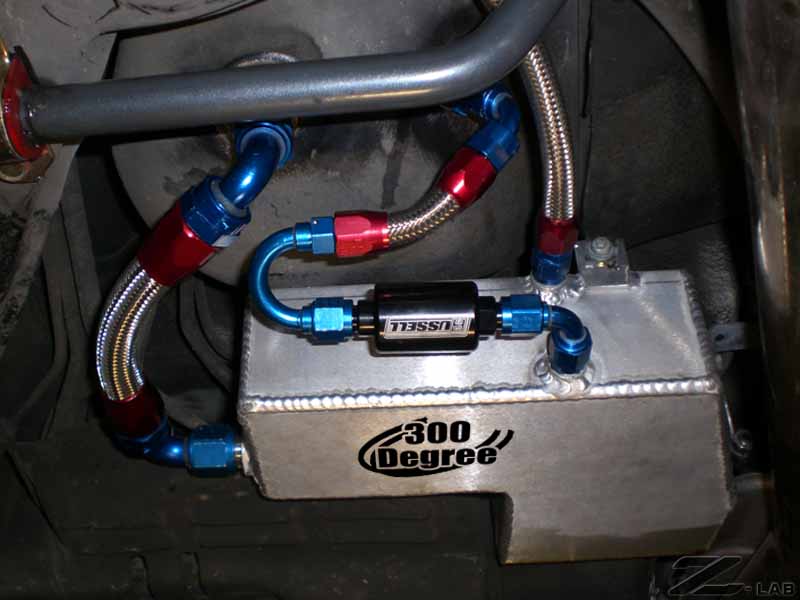
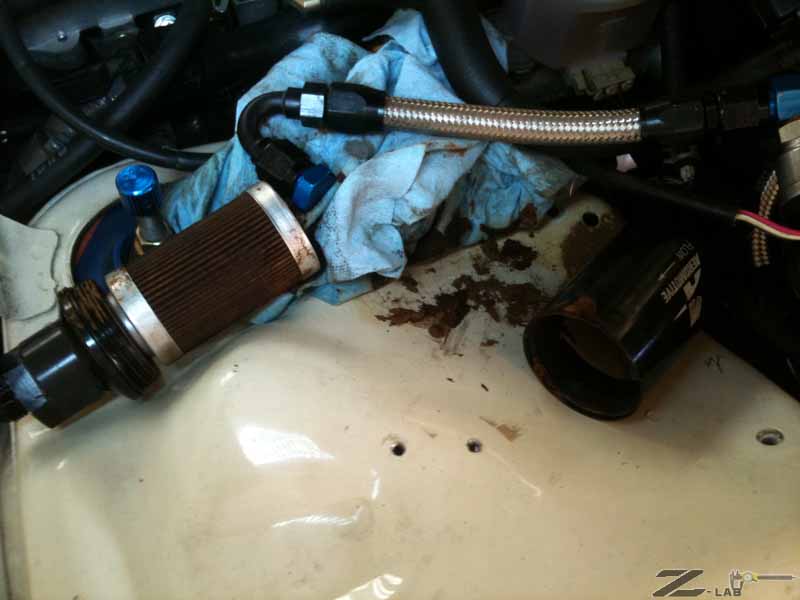
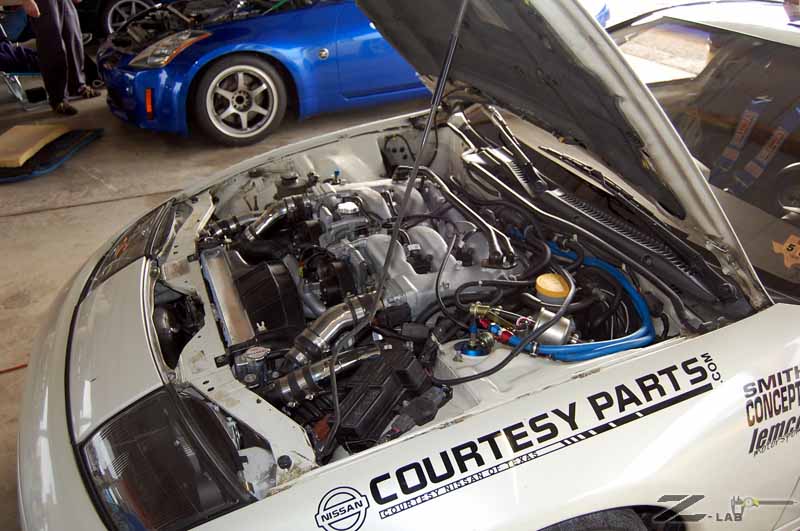
Oil System Improvements - So along with fuel slosh starvation, the same thing applies to the oiling system. There are a lot of other approaches to this problem that have met mixed reviews and results. The real answer is dry sump setup. Wow, that's a lot of work and money to do it. The average weekend warrior isn't going to buy into that since it typically requires dropping the AC compressor and putting the oil tank somewhere not passenger car friendly. What did I do about it? Couple things. Next best thing from dry sump is a Canton 3qt Accusump with an electric valve and custom controller. Where do you put something that odd shaped? I didn't want it inside the cabin with me which is what a lot of people end up doing just because there's not a better place to put it. I don't like having extra hot/flamable fluids inside where I might be stuck during a very bad day. So I cut out the spare tire well and welded and seam sealed in a flat piece of steel.

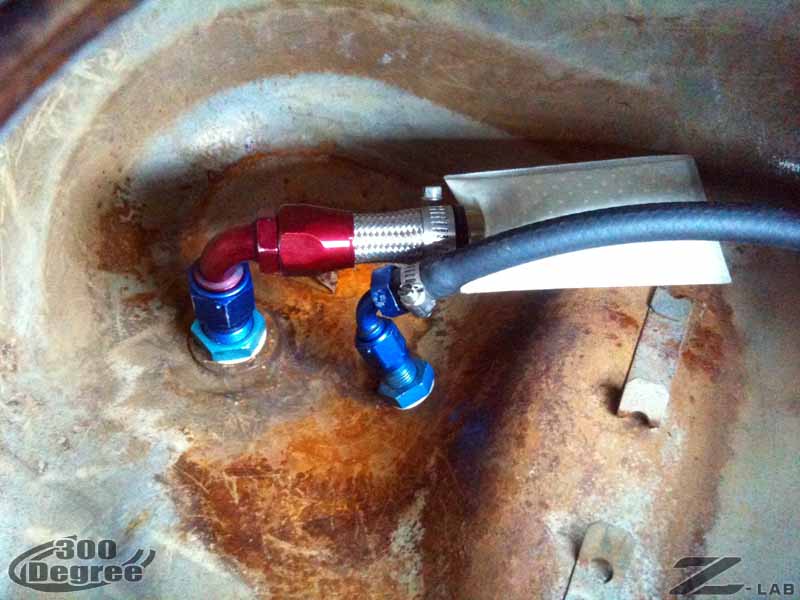
Then hung the Accusump and electronic valve in that HUGE area opened up back there. It is plumbed with AN-10 hose and aluminum tubing running back up to the check valve and whatnot in the right front fenderwell.
This tubing tucks neatly behind the fenderliners when they are installed. Thanks AIVs! It attaches to a AN-10 oil filter sandwich plate from SPL Parts via steal braided rubber hoses and a Canton oil flter up in the engine bay.
The controller is a pretty sophisticated piece of gear for it's seemingly simple task and one of my earliest microcontroller projects. It watches pressure in 3 places and throttle position to determine when the valve should be opened and closed. Obviously a lot more control is possible this way over a simple Hobbs pressure switch.
The knob lets me switch between numerical and graph displays along with a maintenance mode to make adjustments to various settings. The Switch is a manual override for opening the valve to pressurize the system on start up. The light simply indicates when the valve is open. For testing purposes, I made several outputs from the electronic controller to feed into the Traqmate for data logging. So now I can track pressure in the engine, the accusump and when the valve is being told to open and close.
Also back in the days when the pros were driving this engine, they used pumps to drain the heads back to the pan. I did this as well. I also wanted to use the pumps to vent the crankcase to atmosphere and did a lot of bench testing, but couldn't come up with a way to keep it from belching oil out when the pumps were fully submerged. So, I re-instated most of the OEM PCV system for now with a custom catch can.

The driver side pump also tucks neatly behind the fenderliners. Thanks again AIVs!
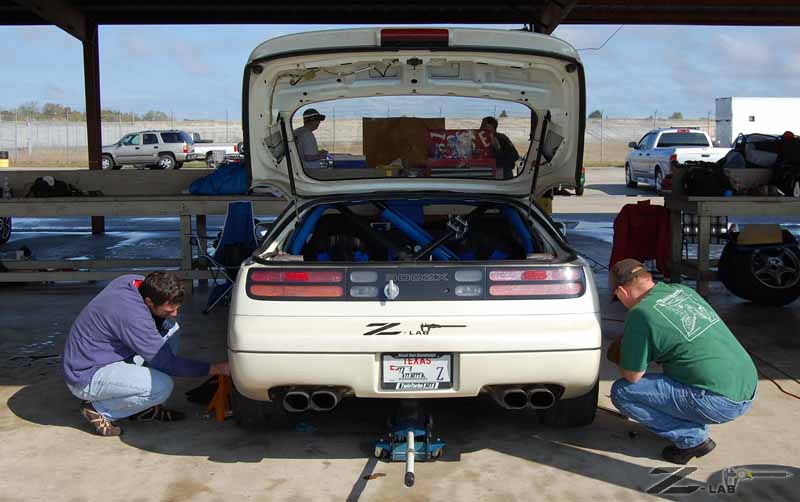
Front Brakes - My last trip to Texas World Speedway was mostly an exercise in cussing my front brakes. My Wilwood setup had caused me headaches because the rotors would get heavy vibration (I won't say warped for a reason) where I could not drive on them once hot. Well, I've been through the whole resurfacing and break in thing a couple times. Runout always was low, so I guess I was getting pad residue on the rotor and causing problems... because I discovered after I did the rest of this project that the front RH ABS sensor was toast and so unbeknownst to me the ABS system wasn't working at all and the wheels were allowed to lock up probably enough to cause the pad deposits. Understand I'm not a ABS driver. I don't just go at a corner and expect the ABS to do the work for me like some. So only once can I remember actually locking up the front tires briefly (cold tires trying to break in pads). Plugged in the little cluster of idiot lights I saved and yep, the ABS light is on. Diagnostics tell me the front RH. Got a new sensor (LH) from Bernie before ZCON2012 (yes you can make a LH work on the RH side, but it's not pretty).
So what came out of this? I can't say 100% it was the ABS by itself. Before I found out this was a problem, I worked out a set of floating rotors for the Wilwood calipers. While this whole thing is 'expensive', compared to blown track time on a travel weekend, it's cheap. Again, I don't get to drive this thing on the street to shake out issues... it's easy to bust a weekend at the track, and that's not cheap. So I ended up with a set of Performance Friction floating rotors and bobbins on custom hats. The rotors are 12.7" and still appear to fit under stock TT rear rims. I haven't tracked with the stockers installed, but have fitted them to try to keep those rain tires I bought available since it always seems to rain when I'm out at the track. On the slicks, the setup is super kick-ass. I beat the brakes at FireBird and ECR with no semblence of vibration from the front finally. Nice!
Keyless start - Well, it's a racecar now. Pushbutton start along with some other functions are on a switch panel just ahead of the shifter. This also removes the steering wheel lock to meet certain safety requirements. I do have security on the car, but it's not by key now. The pumps for the oiling system are wired into the pushbutton panel as well.
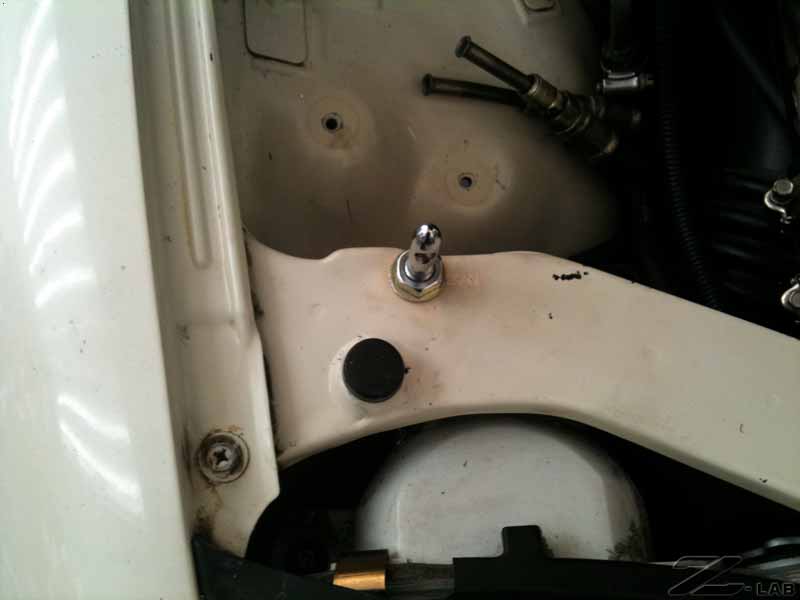
Hood pins - Because Racecar!
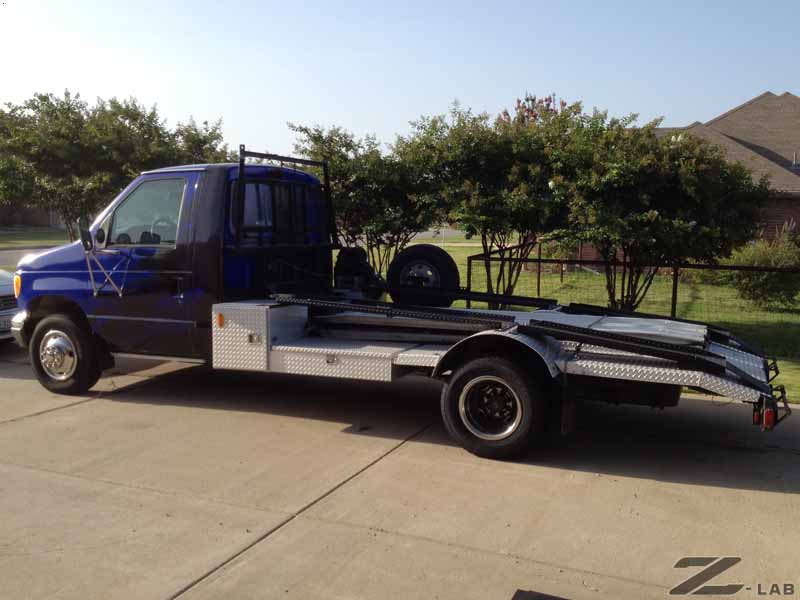
Car Hauler - Trailering everywhere can be painful. I had the opportunity to get a 1995 Ford Econoline Cutaway truck with a car hauler ramp and storage boxes on the rear. Travelling without a trailer is SO much easier. This thing has a 460 in it and gets terrible gas mileage, so it's not all rosey. I can still tow my rollback trailer with another car on it if I need to move two cars at once.
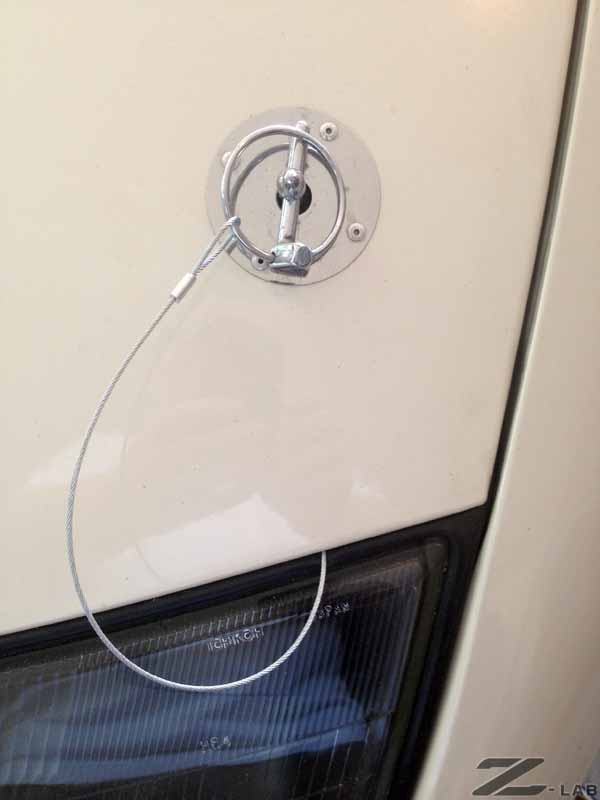
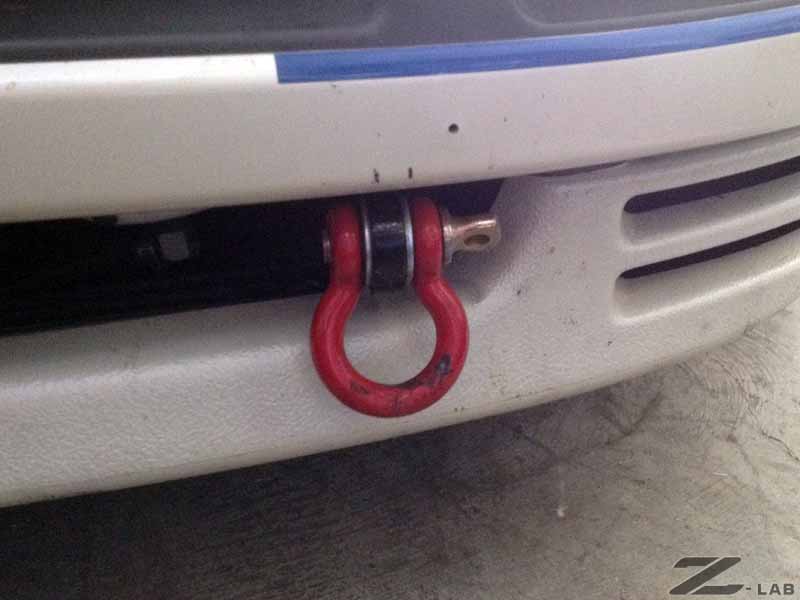
Tow Loop - Instead of putting the winch cable down to the OEM front tow loops under the car, I added a front tow loop to make it easy to get on the car hauler and if the car has to get towed back to the pits, the loop is easily accessible.
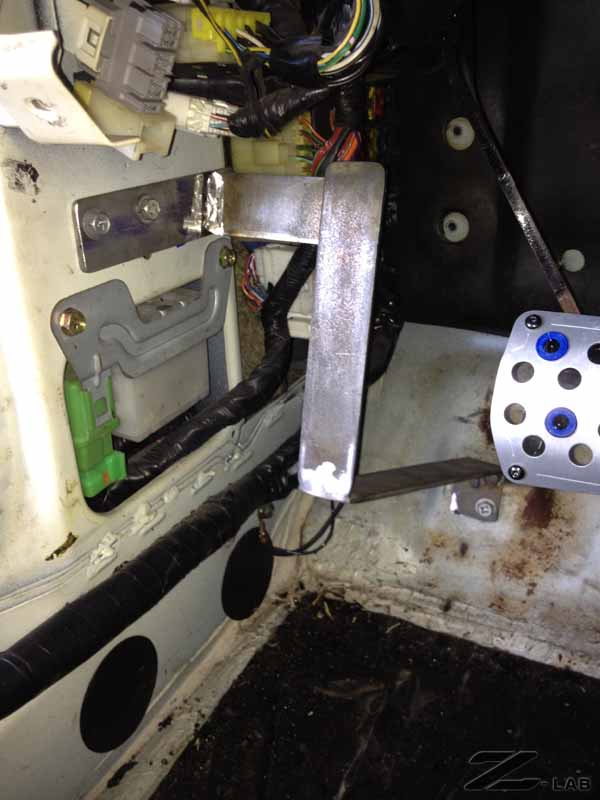
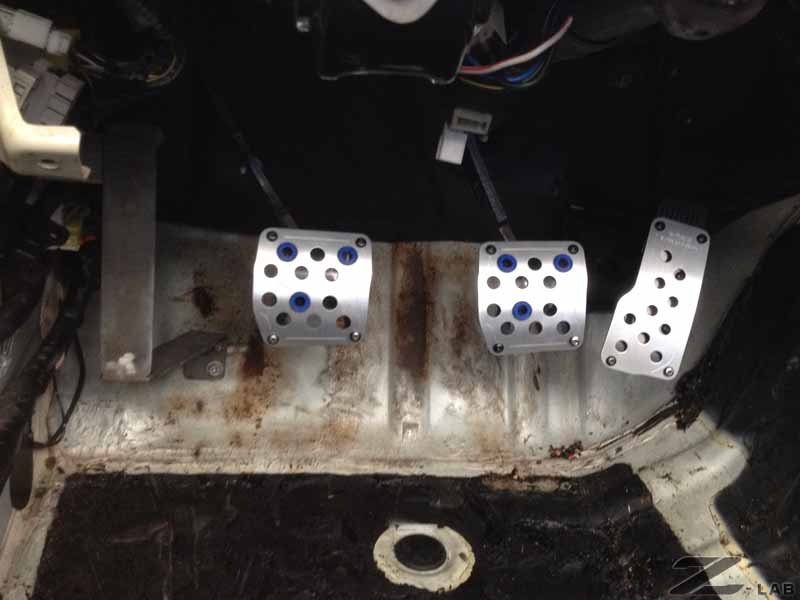
Racing Pedals and Dead Pedal - While in Japan sometime last year, I stopped by Super Autobaucs and got a set of Razos. Got those installed and also fabricated a dead pedal. It is a lot higher than the stock plastic one and will take a bigger shove from me. I still use the dead pedal to anchor me in the seat in some circumstances and it helps keep my foot from riding on the clutch because I now have someplace to put my left foot.
ZCON2012 - Loaded everything on the car hauler and drove it from Dallas to Phoenix in two days. Had a rear flat along the way, so that was fun in the 110 degree west Texas sun.
Went to Discount Tire in Las Cruces, NM and the wait was hours long (as usual, I've given up on DT or NTB now). I drove around the corner to Sears and the guys there had the tire I wanted and fixed the truck without unloading the car first. Thanks a ton guys!! Rest of the trip was uneventful getting out there or back. Here are a couple pictures of the car driving on FireBird raceway, which I'm told doesn't exist anymore.
Gave Kyle, Bernie and Mike rides in the 'Lab. It was hot as F out there and the car just chugged away all day long with no issues. We also got to drive at the Nissan Arizona Test Center. This was a kick in the pants if you got to do it. I drove it a couple times and the first go 'round was relatively tame until we got to the high speed part up on the high banks. There was a lot of sandbagging going on and once we got to the high bank, some might have been going over 150? I dunno anything about that, I had my wife in the car with me. A few of us hung around where the cars were going out under test driver supervision and were bugging them about how fast they go and whatnot. Well, the drivers got excited about seeing cars go around the high bank, so we got them in the lead/follow vans with a very small group. This time out Turk rode with me and some might have been going over a multiple of 80mph? I dunno anything about that either, but my Traqmate might have an official reading if I review the datalog. However fast Z-Lab was or was not going, it was nice and stable out there. I even took my hands off the wheel at near full speed to the delight of Turk. Hey, the test drivers say they do it all the time and I roll with 'when in Rome'...
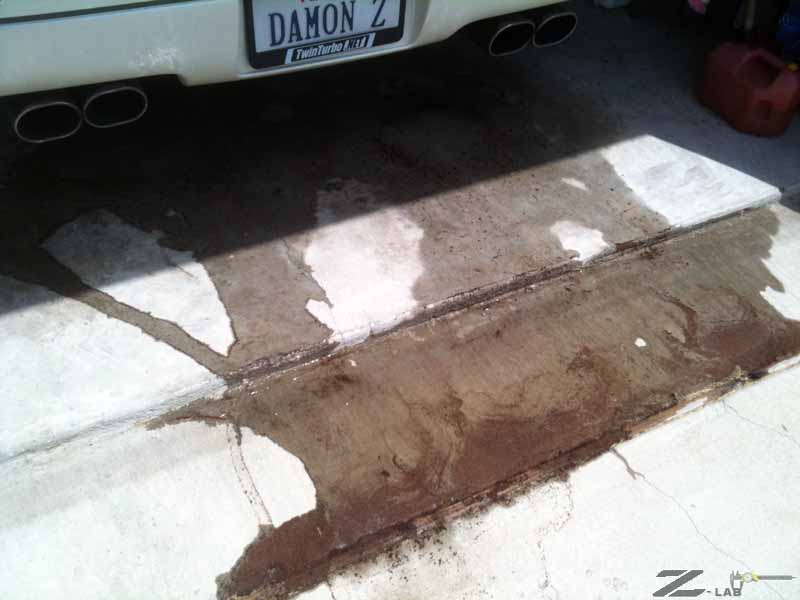
BRB and the Oil Leak - I've had a pretty major oil leak since the last engine refresh. I can attribute it to the Rock Auto pan gasket I installed back then. After running I'd take down the front splash cover and clean the underside of the engine bay. Finally I just wanted to get it fixed properly by dropping the pan and removing the gasket. I really didn't feel like pulling the engine again considering all the work I've done to the top side of the bay and the oiling system work. There are a lot of extra hoses to route and deal with now unfortunately. I've dropped the pan on a couple customer cars but the crossbar I used to hold up the engine was actually a hi-lift jack. Not completely comfortable with doing it that way again, I decided to make a piece of tooling to help with the job. The Big Red Bar (BRB) was created.

The oil pan was removed and the gasket replaced, I haven't noticed a leak since. I do have to say it was still more painful than I remembered. Trying to get the rack out of the way so you can get the pan over the girdle without rubbing off all the RTV was a challenge. I'm at about 50/50 for if this was the best approach or not. If I didn't have the additional stuff in the bay, I would say no. I was able to clean up a few things related to the oiling system along the way, which is helpful for future maintenance.
I've got more new stuff going on the car in the next couple months to test and hopefully get to market for 300 Degree soon.
10-12-2010
Covered a lot of ground since the last update. Everything was a big rush to get to ZCON2009 in SA and documentation took a back seat. At the same time work was really intense, so much so that I spent most of ZCON on the phone with the office and customers ensuring things were progressing in my absence. It wasn't remotely a vacation. Sorry if I seemed put off socially but that's how the big kid world works sometimes. Anyway, the track day was a bit disapointing so the Lab just rolled into the garage and was forgotten for the better part of a year. I finally finished the major dev phase of the program I manage and my boss put me on extended leave. I haven't been to work in 3+ months now while consuming unused vacation, PTO & comp time... this is after cashing out 10 weeks worth of comptime back in June. Sheesh. Anyway, here's the rundown of how things progressed before ZCON and then the last month or so since I've gotten to spend time with the Lab again:
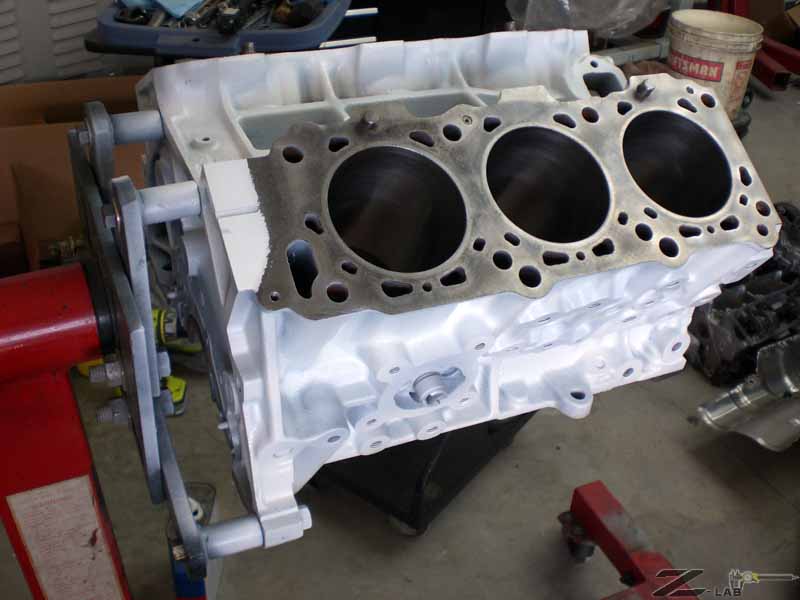
May-September 2009 leading into ZCON2009 was spent finishing up the engine refresh. Seriously, it started out as a hone, re-ring and put in new bearings refresh. It turned into an extravaganza of timewasting on my own part. I typically let Day Custom Engine do my shortblocks completely. I thought this would be simple to do the quick refresh. When John was doing the hone and general tolerance checking on the block itself, I showed him the bearings. Perfect wear on them. He typically only gets to see low mile race rebuilds when they get blown up quickly... so it was nice to look in a 'fresh' engine and see how the bearings were wearing. If all the sizes were correct, then it should be simple to just replace them with the same ones again and go about my business, right? I was wrong. I should have had John do all the work like normal and saved me the ages of check & recheck required. I had to go relearn the bearing grade thing since the dots were removed from the edges of the bearings, etc. painful. Thnakfully it seems I have selected the same grades as before. Hell, I probably should have just reused the original bearings from the first motor build and called it a day. Live and learn. I've got a second shortblock I think I'm going to run through IPP to start a larger build with in my garage now. Probably a good idea.
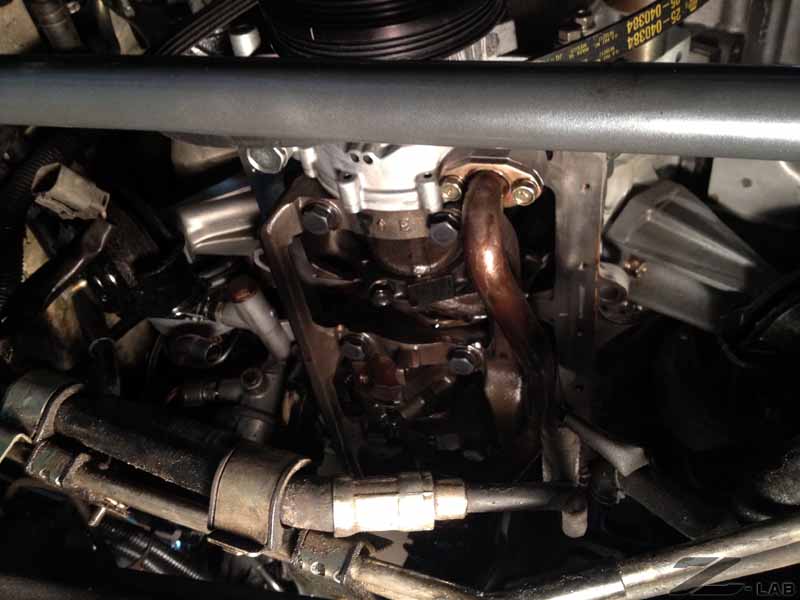
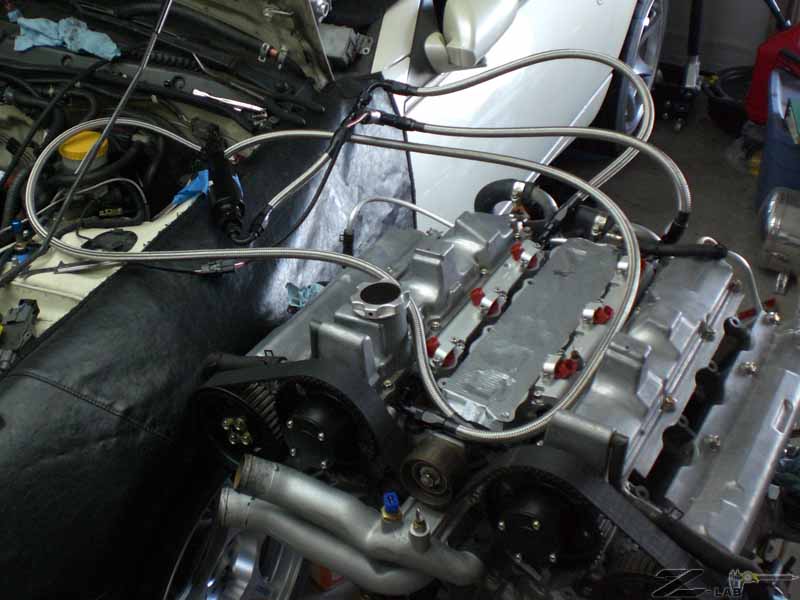
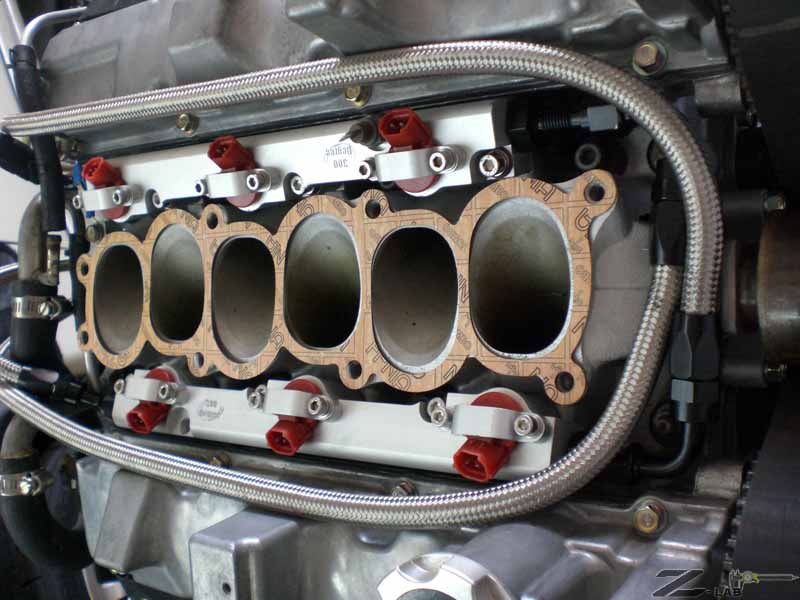
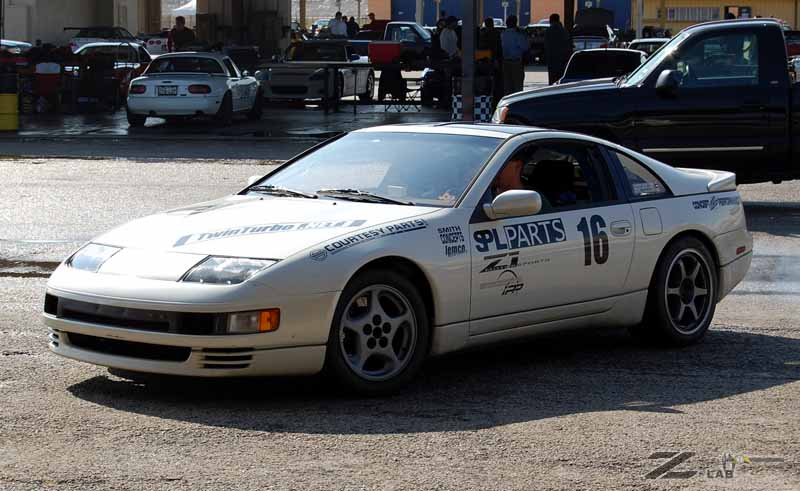
Along with the shortblock refresh came bits from Specialty Z; MSP manifolds, JWT530 turbos, SZ oil lines, SZ 3" expansion downpipes to pick up the pace a little and get rid of the leaking rebuilt OEM T25s. I also upgraded the 300 Degree HPFR kit to the SARD 850cc level and did the rails in full parallel. It gets really tight in there if you use regular braided AN-6 hose. I now have a 37 degree flare set and tubing and ends. When the plenum comes off, I'll redo all the flex hose with hardlines to clean that up a bit. I s-canned the JWT chipped ECU and built up a NISTUNE for the car. Thanks to Harry @ ztuner for helping tune the car remotely! Then, thanks to Guapo & Tu's lead, I redid the rest of the fuel system as well including a big Aeromotive fuel filter and Aeromotive FPR. The rest is braided hose and black AN-6 fittings. Very sexy indeed! I got all the nuts and bolts for the exterior of the engine yellow zinc'ed so they aren't grungy. Oh, and my engine block is gloss white to show leaks easier. I included some plumbing for the oil pressure issues to work with in the future and also worked on a solution for the fuel sloshing problem. I've added an APR Racing contoured CF wing for more downforce in the rear. Typically ricey, it's actually functional and I can tell a difference on the car's handling. I installed a Sweet MFG steering wheel quick release and a cheap but nice on the hands Grant wheel. All the car graphics were updated to give it another new look. There's still more to be done in this department, but I got my sponsors covered. I put the GoPro SD camera in the car, and was disappointed. It doesn't meter light well, so the video is the interior of the car and washed out windows. You can't tell anything about the track. I got the Traqmate installed, but not completely, so I got 0 benefit from it. There's a handful of other things that are in the build now that I just can't remember off the top of my head. I have to go from bumper to bumper and update the mods list to get caught up.
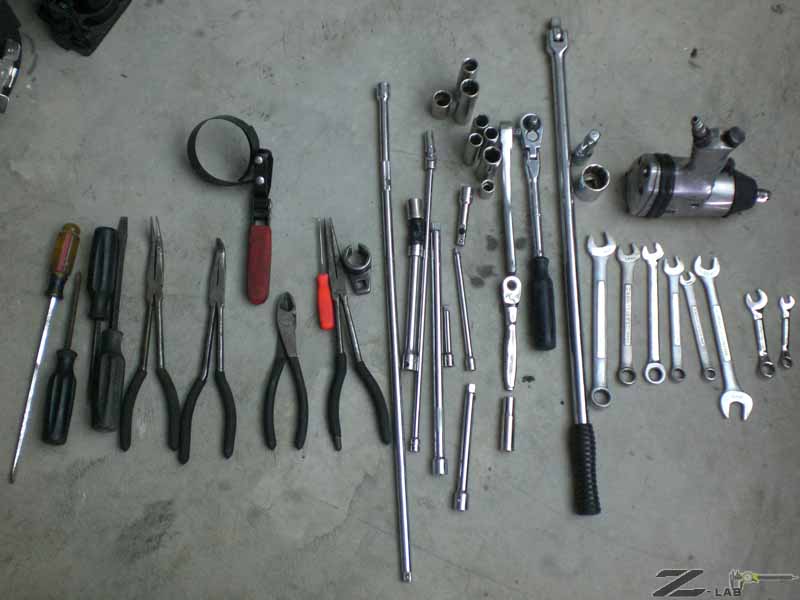
Every hand tool I use to pull an engine out of the Lab
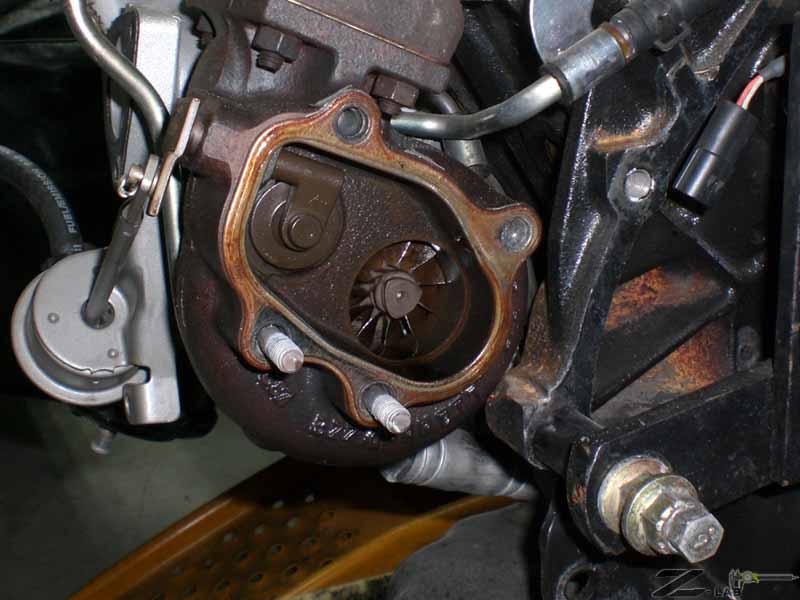
Blown seal on the OEM rebuilt turbo
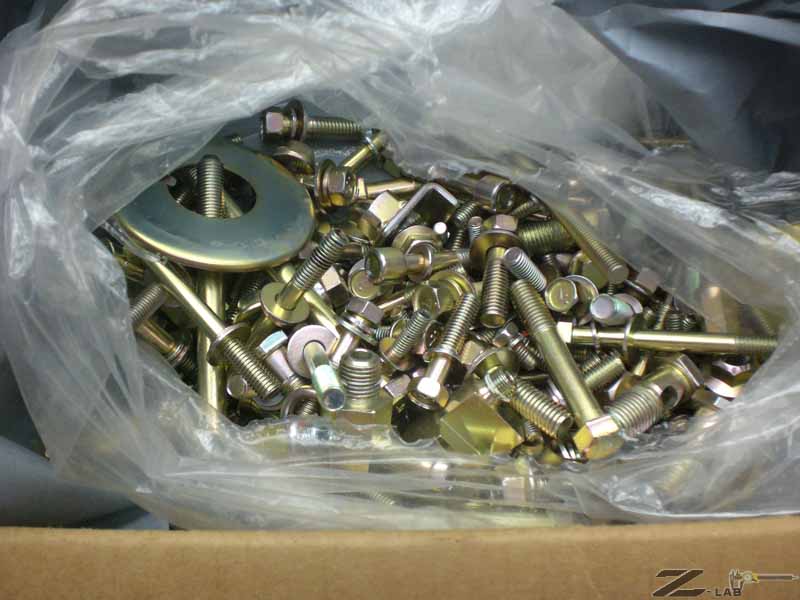
Rezinc'ed bolts
Guapo de-winging Z-Lab
Pressure testing the updated fuel system
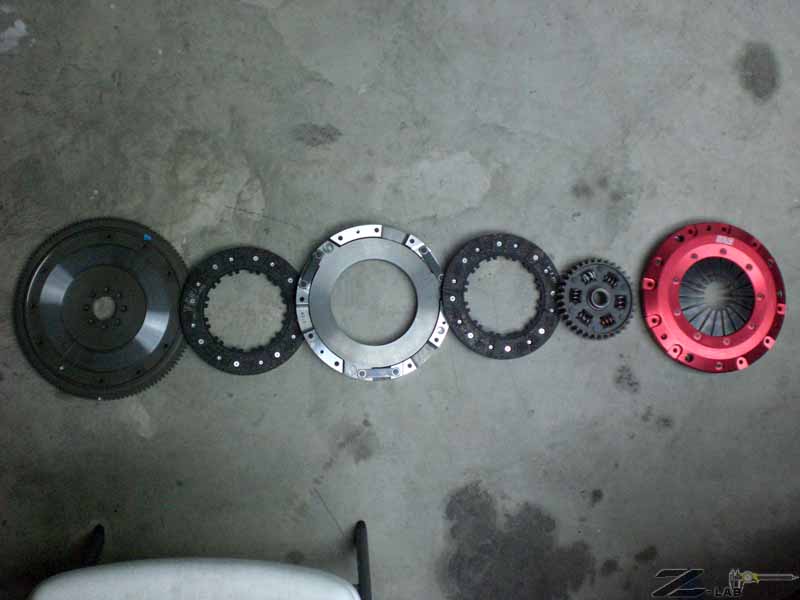
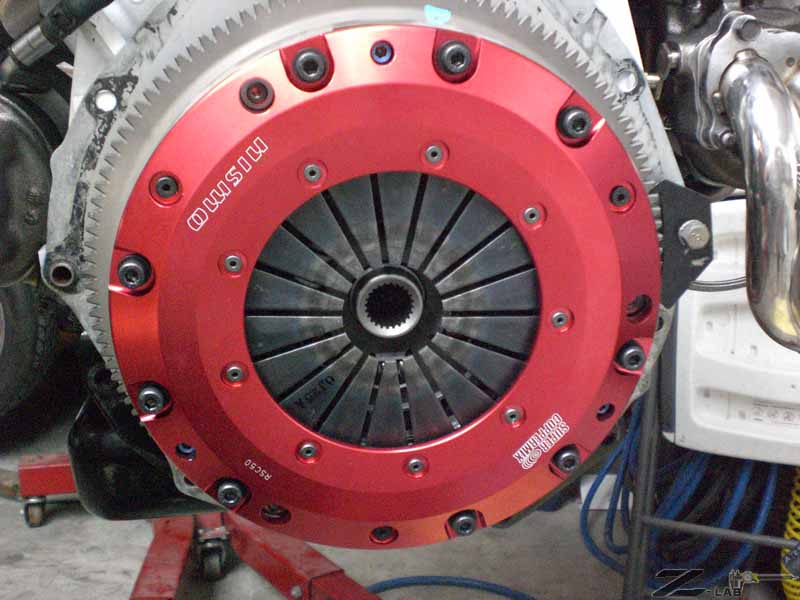
NISMO SuperCopperMix clutch
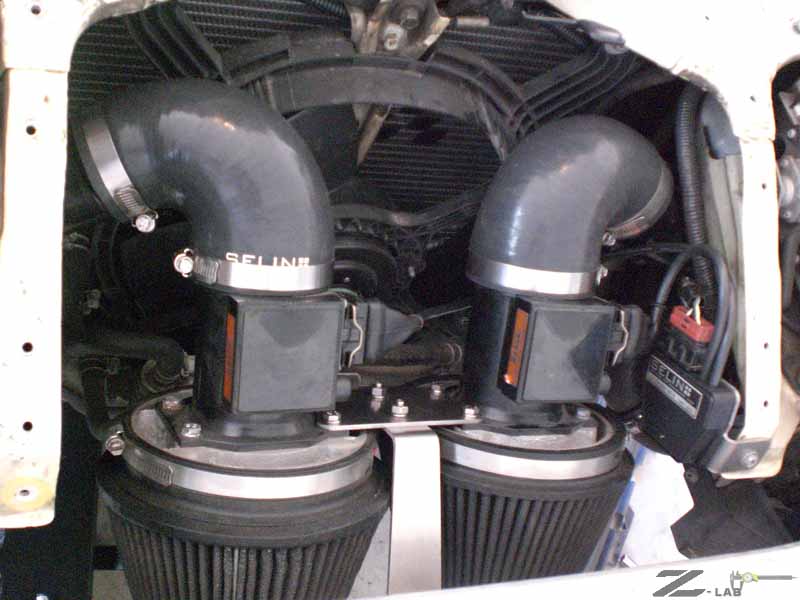
Selin Designs pitched in a complete setup for the dual intake elbows and the MAF translator, thanks for that Jim. I have to say this is an idea that's been rattling around in my head for 300 Degree to do for about 5 years now. It's nice to see it get done even if it's not by us. The kit is very nice and simple to install, does what it's supposed to do and introduces no hassles. Thanks for the sponsorship Jim!
So, how did it all come together at ZCON2009? Pretty well, except the fuel sloshing solution lead to the demise of the fuel pump on the first session of the track day. I haven't had to get towed to the pits in a very long time. It happens from time to time when you're working out things like this, so you have to sit back and enjoy the scenic, long cooldown lap. Greg offered the pump out of his Blue Beast which we got installed in the pits to make the car go the rest of the day, unfortunately this meant OEM bits and I had removed the OEM sump box from the fuel cell. Right hand turns were awesome. Left hand turns I had to coast through because the fuel would, again, slosh away from the pickup. Put it on the trailer at the end of the day, hauled it home and parked it until I could find time to get it sorted enough to put on the track again.
What was the problem? Well, the fuel tank had a lot of crud in it. River silt is what it looked like. The tank isn't really rusty, it's residue from the car sitting around for 5 years w/ gas in the tank. I've cleaned the tank completely with a garden hose washing out the silt. Got everything dried out rapidly with a leaf blower to keep it from rusting any further. Scraped all surfaces with a nylon brush to knock off any remaining scale or residue, and there was a bunch in there. With everything cleaned out and some adjustments on how fine filtration works, the new pump should have a normal life with the fuel sloshing solution I've worked out. I've been slowly working on this for most of the year along with getting other things completed along the way.
One other problem I need to point out was I thought I would be cool and use a RockAuto rubber oil pan gasket, instead of using silicon sealant and then having to scrape everything away every time the pan has to come off. What a F'ing mistake this was as it doesn't seal for s***. The sides are fine, the half-moons over the crank ends aren't large enough. If you want to use one of these things, hose down the ends with silicon sealant to make sure it doesn't leak. I found this during my boost leak check before even driving the car. I put a bunch of silicon sealant around the area in hopes to close it up, but I guess I couldn't get the surfaces clean enough because it's still leaking after I tried to seal it. It's not getting anything on the belts, but it did ruin my brand new engine undershield.
I've been a member of Eagle's Canyon Raceway for 3 years now and still had never set tires on the track. Once I got the car sorted the way I wanted, I figured I might as well run a member day during the week and shake out whatever mess I'd made. September 2010 I got Z-Lab back on the track. I was able to run 2 sessions on 5 gallons of gas. So what? ONLY 5 gallons of gas in the tank. In actuality I probably had it run down to < 2 gallons before I started sucking air. The fuel slosh solution seems to work fine. It's way overkill and now that I know a lot more about how to deal with the problem there are some easier ways to go about solving the problem, but it looks cool on the car so I'll keep it. Biggest issue is as a 300 Degree prototype, the kit is sellable but I think the installation is a bit over the top for most potential customers. We're looking at these other means to solve the issue almost if not as effectively as what I have now.
I also got Traqmate up and running and was able to track my data throughout the day, my lap times got down to a 2:12 and there's still a ton of braking where I can carry more speed or hold more speed before dumping and coasting into a couple corners. I'm also not running the AVC-r yet, the engine rebuild has very limited miles on it yet, that's worth a couple more seconds. I'll head back up there soon enough once I get the car completely shaken out and see what I can get it down to. A 'competitive' lap time based on what I've seen on youtube is about a 2:03. I've got some work to do, but don't feel too bad about the starting point.
Arg... there was a downside to this. The grasshoppers were terrible out there. There were sitting on the track and in the grass next to the track. I'm still picking grasshoppers out of the front of the car. I spent all day cleaning out grasshopper parts out of the radiator, intercoolers, inside the wheels (SPL air deflectors send them right into the brakes), everywhere. Blech!
October 2010 after the ECR shakeout I put Z-Lab on the trailer and hauled down for a Driver's Edge HPDE event at Texas World Speedway. For some reason the car didn't want to start after I shut it off driving over to the grid. Had spark, had compression, had whatever. It would start after I pulled the CAS off the car and then cranked it around with the key on to hear the injectors click. It's like it's not dumping in enough fuel during the startup. I'll have to spend some time on that aspect of the system. Had to do it twice and caused me to miss my first session. Once I got it started the second time I just let it run for awhile to get the battery juiced back up, I did a hell of a lot of cranking trying to sort it out. Still confused, but it caused no problems the rest of the weekend. I killed other sessions working on the front brakes. I had to rebuild the front rotors and replace the pads after the ECR shakeout and this caused problems all weekend with vibration once things got up to temperature. The downside to a racecar is you can't just put it on the street to work issues like these out. Other then that, I have developed a 2 page long to do list for the immediate future of Z-Lab to bring it into a 'complete' state.

4-6-2009
Spent more time this Sunday on the engine. I spent last Sunday working on it as well. Got it stripped down pretty much completely. I haven't looked into the turbo problem closely, it's not a big deal since I'm replacing them with 530s. I'm more interested in the #2 cylinder thing. I need to get the engine in better balance before starting to push it harder. In reality, I only drove a few sessions with 15psi. During the lifetime of Z-Lab I had some fuel starvation because of the sloshing, so detonation was invitable. The bearings don't look bad (just minor scuffing), I had more thrust wear than anything. I also have grooves worn into the crank at the front and rear seals. I don't recall those being there before. I'll replace those seals and set them at a different depth to get out of the grooves. Fun part is I got the time lapse thing working. For the build, I'm going to want to change camera angle and see if I can capture more detail of what I'm doing... better lighting, that sort of thing.
It's time to make a long list of gaskets and the whatnot!
3-22-2009
Engine came out today in about 4 hours start to finish. I tried to do some cool time lapse stuff with my GoPro camera, but I failed... the batteries died, or I can't read instructions, or something... I'm not sure yet. The camera is pretty cool, but the attachment stuff is crappy. I broke 2 of the attachments in less than 5 minutes of pulling them out of the box today. In reality all I need to do is get it mounted on the foot of my IO-Port racing camera mount and call it a day. Just need wide angle video to go along with Traqmate... so not such a big deal just annoying.
Anyway engine is on the stand. I'm going to pull off the left head to see about #2's compression. Flip it over and look at the main bearings since I had potential oiling problems. I also want to get a look at that left side turbo to find out why it was leaking. Spend a couple weeks getting some details straightened out and get it on the track sometime in May. I'd like to do Mayfast at Hallet this year, but I'll be at a tradeshow in Nashville that weekend. Bummer. Have to find some replacement event.. I just want to get on the track before the temperatures get too damn hot here in TX.
2-15-2009
A year got by with no track time... that hasn't happened in quite a while. Having a kid will definitely re-arrange your life. If you're about to be in that business, don't think it won't. I get bits of time here and thereto do Z stuff and I've been concentrating on my street car and some 300 Degree projects over the holidays. Well today I finally buttoned up the fuel slosh solution on the Lab, so that needs to hit the track. Now I decided I'd pull the engine and get the new goodies installed from Specialty Z. I'm tired of the leaky turbo BS. Also have few other non sponsored bits like a new NIStune to go with my Innovate wideband. 530s, MSP manifolds, 3" expansion downpipes are the main attraction from SZ. I'm also going to install the oiling solution I've thought out. There's a couple other details I need to attend to as well unfortunately...
Since the car was warm from switching garage slots w/ the street car (of which I had to completely drop the transmission to fix a turbo gasket erosion/leak problem and then just put the OEM gutted downpipes back in *sigh*) I decided to do a compression test before the engine came out for the quick parts swap (that will probably take 3 months). Generally 145-150psi with the exception of #2, which blew out a whopping 120psi. Crap. Put oil in the hole and comp came up to 140. I have a ring problem it seems. I guess while the engine is out I'll take a look in there and see if there's anything to see. The spark plug came out looking about the right color. Hone it, re-ring it and get on with life for now. Not sure I want to spend a lot of time on it considering phase V of this thing is a built block. Currently it's all OEM.
While it's going together, I'm probably going to up the injectors to SARD 850ccs since I've had a set sitting around for 3 years from HPFR development days. Get the NIStune up and going. I got the software functioning today with the Innovate stuff just to see it work. I'll get the hardware in the ECU sometime this week while at work, looks simple enough. I still need to sort out intercoolers and dual intake. I'd like to do headwork, but I don't want to really tear down the engine and spend the time or $ on it just yet. I think just having the rest of the stuff installed will make the car plenty fast for the moment.
9-27-2008
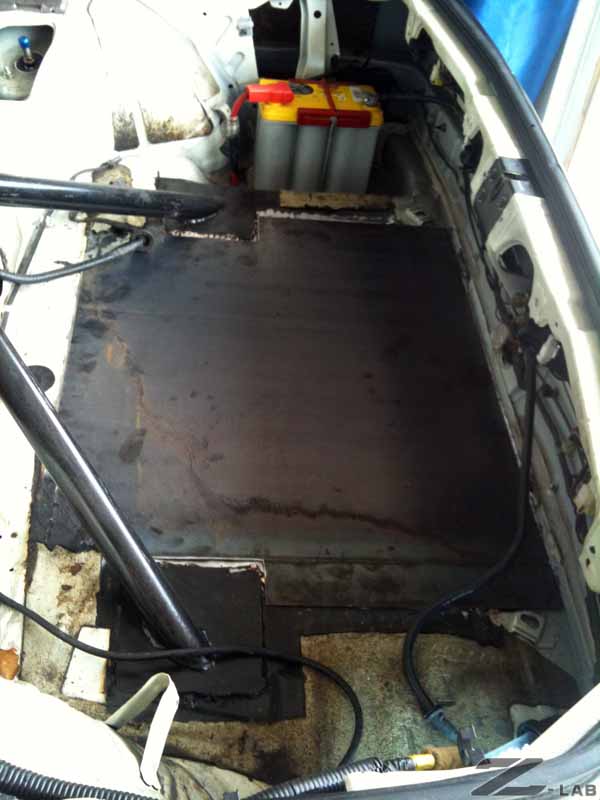
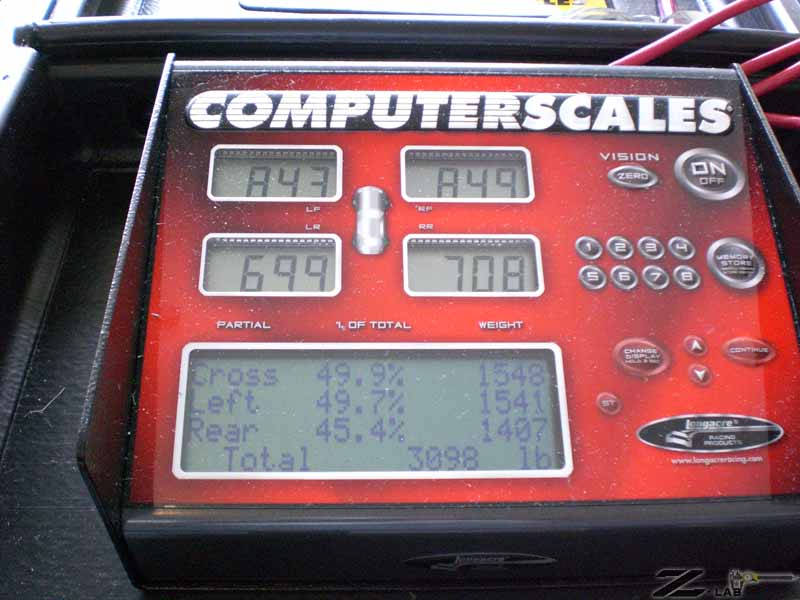
Got a few hours today to siphon the gas out of the fuel tank. Had to take the top off the fuel tank. Drained everything and pitched the fuel pump and the other stuff back on top of the package tray area. Got the car down to 3098lbs.
I wanted to get down below 3000, but I don't think I can find another 100 lbs to lose considering the more I get out the more I need to add in. I need to complete the roll cage, then work on the accusump, etc. I guess I'll be happy to keep it sub 3200 all things considered.
While studying the fuel sloshing problem, I knew there was a false sump in the bottom of the tank, but I hadn't been able to really look at it since my prior fuel pump work on this and other cars has had 1/2 full tanks. Here's a crappy photo of it.
While siphoning, the tank is a saddle type design where there can be a considerable amount of fuel trapped on the right side. I needed to empty that out to get all the fuel out. This is the biggest problem with the pickup getting uncovered at what is metered as 1/2 tank during a hard left turn. I had to pop the top off the right side. I never knew what the hell those wires went to over there. It's a secondary fuel level sender under there. I guess the saddle problems also make measuring the fuel level problematic. Really, I don't care since the level that counts is what's at the pickup tube and fuel pump. Might leave it unplugged it to see how the guage reacts.
9-21-2008
With the advent of the pregnancy of my wife and subsequent arrival of our first child Miles earlier this year, a lot of things in my life including Z-Lab have been put on hold. Now that we're getting into a reasonable routine, I've been able to spend a little bit of time with the lab.
After the November TWS event, I bought a couple things to sort out the tire problems during that event. Some 5Zigen FN01R-C's (9" front, 10" rear) from SPLparts wrapped in Toyo Proxes RA-1s shaved by Autocomp in Fort Worth. I also bought a set of Bridgestone Potenza RE750's for the stock TT rear wheels I was rolling on, so now I have rain tires finally.
I also bought a couple other odds and ends for data gathering. A Longacre laser pyrometer, Traqmate GPS data acquisition, and a set of Longacre digital corner scales.
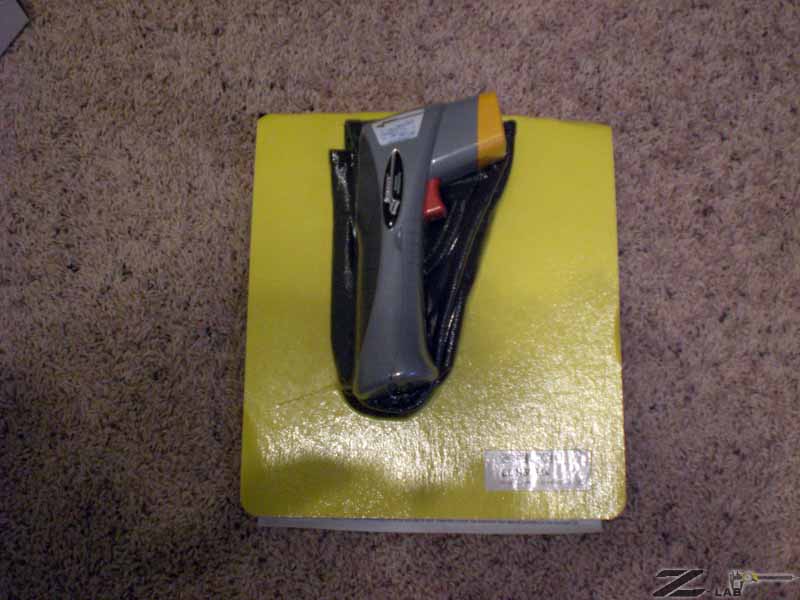
Haven't done much car wise with the pyrometer, mostly just walked around the house shooting things with the laser and checking temperatures... what it's for in real life is being able to take tire temps if you can wrangle someone to jump the hot pit wall and scope them before they cool off any.
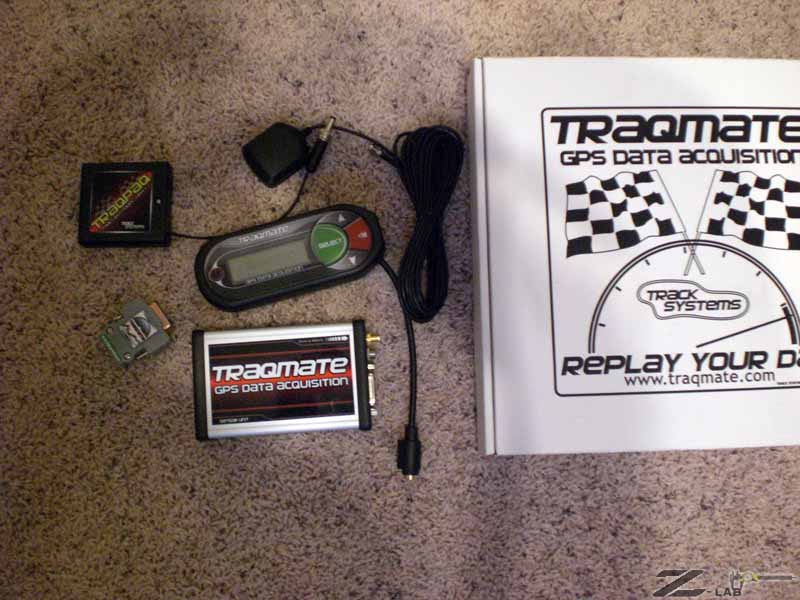
Traqmate is sorta in the same boat, I've used it to doublecheck my speedo in my Xterra. The GPS tracking is very cool and I've only gotten to use it in rally mode so far driving back and forth to work. I bought one of the input modules and will get it wired into the car to track RPM, etc as well as position, etc the unit itself tracks. I also bought the battery pack so we can move it to other cars and learn from each other at the track. Should be a lot of fun. I still haven't driven Eagles Canyon yet even though I've been a member for like 2 years now. I want to use it to track my progress from the first lap to the end of the first day and see how things overlay. While the Traqmate will be super cool once I get to use it, the Longacre digital corner scales are interesting today. Disconnected both sway bars and leveled the pads. Dropped the car onto the pads and was pleased with the results.
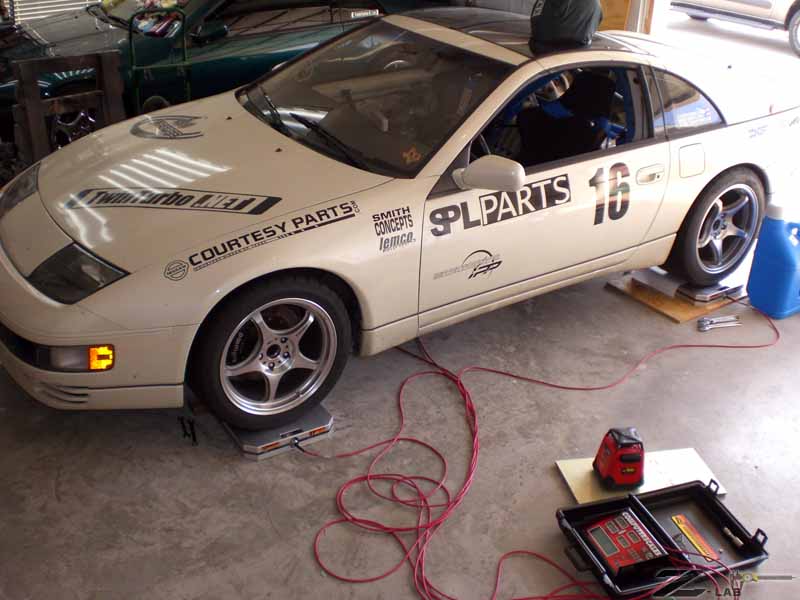
Without my fat ass in the car the weight was 3178lbs. with 5/8 tank of fuel shown on the guage. I'm going to drain the tank next and see what the dry weight is. You want to weigh the car in race trim, which is typically driver in protective gear with about 1/2 tank of fuel in the tank. I'm not that super worried about the exactness of it all, the unladen weight included my helmet in the photo below (+3lbs). The bottom stats are the interesting bit. A Cross weight of 50.2% is pretty well balanced. The Left side is 49.7% of the weight left to right, and the Rear end is 46.4% of the weight front to rear. So unladen, the rear can stand to have a little more weight, while the side to side is fairly well balanced for starters.
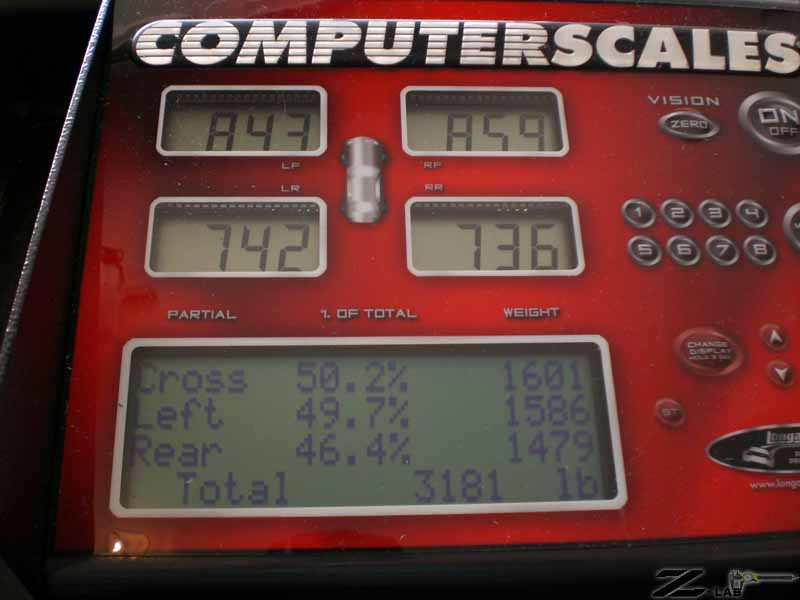
With me in the car, things changed a little bit. The Cross weight is 50%, can't ask for much more then that.. except to do it with about 20 less pounds of me. The Left side went up to 51.4% and the front to Rear is now a little better at 47.2%. So you might be asking yourself if everything was square to begin with, how did the cross weight get better if you added oh... 208lbs of me in the driver's seat? Simple. I had already compensated for this on the SPLparts coil overs when I installed them 2 years ago. I guessed pretty well from the looks of it.
| LF 916 | RF 872 | |
| LR 827 | RR 773 | |
| CROSS | 50% | 1700 |
| LEFT | 51.4% | 1743 |
| REAR | 47.2% | 1601 |
| TOTAL | 3389 |
As far as the fuel sloshing problem, I'm pretty sure I've solved it, just need to get the prototype bits from the fab shop and get it installed. I've been talking to Don (Aliaz) about the oiling problem as well, and I have a couple simple things I'm going to try first before getting into the more complicated methods that are sure to solve it. In acutality, the last run at TWS wasn't too bad, but as my mantra goes 'faster equals more new problems'. With better tires, I'm sure it will come back. I'm going to have to fake up a spintron or something and lean it 45 degrees to find out what really happens in there. Also curious about how many gallons per minute the oil pump really moves. Mocking that up shouldn't prove too difficult.
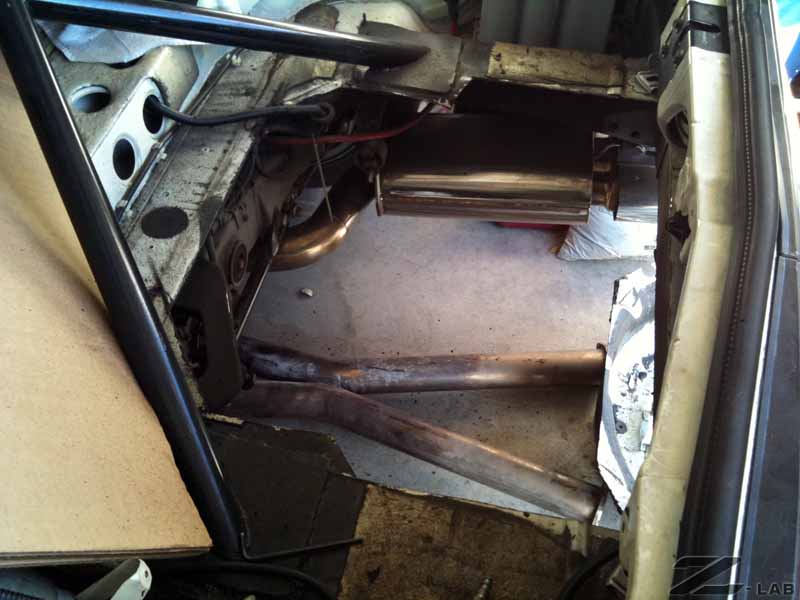
I've also started looking at a new exhaust system for the Lab. I need to return the B&B to my green Z, 'cause it's way wimpy with a stock exhaust on it. The racecar is a racecar, so I can run something a little louder without offending a lot of people's sensibilities. I know what I want to get done, just need to execute.
And for Scott, the 'B' in Z-Lab is .917" wide.
12-3-2007
Spent a lot of spare time on the Lab getting ready for another lapping event at TWS. I replaced a couple OEM parts on the car from things that were near the point of failing. I also added oil and fuel pressure gauges to monitor what's really going on in the engine. I installed a camera mount for the HDD camera my wife bought me earlier this year. I got the HI overdrive water pump pulley installed. I also did all the routine maintenance things. Changing the oil, etc.
Import Parts Pro pitched in an Apex'i AVC-R to help the boost situation (thanks IPP!)... and it's not a regular install. I did a dual solenoid installation which is something I've wanted to do on a car for a long time. As far as I know, only Grid produced a dual solenoid controller. Until I test to find out differently the head for the AVC-R seems to be able to crank both solenoids evenly. I'm going to put two pressure gauges on there to see if everything is kicking the same.
Nov 17-18th was a lapping event at TWS. This is my 3rd trip down, and I have to say again... it's awesome! Aliaz, Kuah, sfarrah (and new bride Becky), and 300twinz (satx) (Luis) went out with the Z Club of Houston crowd. It was threatening to rain in the forecast leading up to the event. It's rare when I can go to a track event and not get at least a 1/2 day of rain. I've been thinking of buying a set of 17s for slicks and getting treaded rubber for the TT rears currently on the car. Then at least I would have something to drive on when the weather turned to crap. Then again I had it in my head that the car wouldn't get driven in the rain (because of the slicks) and I've just left the plastic liners off the front wheel wells and haven't worried about plugging up the hole where the antenna goes or much any other weatherproofing. After saying all that, I did take the time to wire up the windshield wipers on the aluminum dash panel to a single on-off switch (with no extra swipe!). Go figure.
Well, I got on the road at about 4p on a Friday after working all day on getting the car in shape. Somehow I managed to get to the south side of Dallas without hitting terrible traffic. I made it to the track in about 3 hours 30 mins which is about average now. I dropped off the car and got everything moved into the garage space (worth the extra $) next to sfarrah and Kuah. I catch up with the gang at the hotel and we roll up to On The Border for some adult beverages and carb load for the next day (yeah!).
Saturday is wettish. I got 3 sessions on the track and the first was half assed. Slicks and wet track don't mix well and I found myself sideways coming out of 6 onto the back stretch. 2 in and all 4 on, but black flagged because of it. Luckily no one was in my rear view or it could have been ugly. I limp back to the pits gingerly as to not end up in the ditch as it starts to sprinkle some more. The HDD camera doesn't take to being jostled around a lot, even on the IOPort mount. I'll try it again on another day but I fear the vibration is too much for the HDD, so I'll have to find other means of recording the visuals. Probably just get a cheap 8mm with wide angle on ebay. The next couple sessions are better with a drier track until I come in after the 2nd run. Crap. My right rear tire is showing cord on the outer edge. Even with -1.5 camber my tires look like cones. Considering the chance of rain is still high for tomorrow, I'm mentally gearing up to pack it in and head home. I talk to the track folks and they point me to a pile of tires in the pits left out from some race shop. Lots of 18s and 17s with reasonable slick left to them (on hindsight I should have loaded up a 4some anyway just to have). I wander around talking to folks, but nobody has anything that will work as a replacement or set of replacements for the rears. Not surprising considering the size. Sean comes up with the idea to put his front wheels on the rear of the Lab for the last session before I leave. We jack up the front of his car and pull the 255s off it and get the rears off my car and swap them out. Damnit! The lugs are different. I need thinwalls to go in Sean's wheels. Well, Luis is in between sessions and has correct pitch thinwalled lugnuts on his car. So we take 2 off here and 3 off there... to make a set of 10 for the car. I keep stalling because it starts raining and then stopping, raining then stopping. Screw it, we've done this much work I need to at least go out and get around the track or get muddy trying. 2 Zs down to get 1 back up. I go out and have a fun last session of the day. Forgot to mention the BOOST!!!! I'm kicking around 12 PSI, but it's more then the car has ever made before. I can chew up the straights and get clipping up to the 130 mark on the front stretch now. The windshield wipers do their job albeit slowly at 100+. I wrap up the session and decide to put 4 loose in the truck and head for Discount Tire next to the hotel.
It's now 5:15p and pouring down rain. I get to Discount Tire and the little prick behind the counter wont' do business because they closed at 5. F*CK! aren't you people hourly? I'm going to buy $800+ in tires and you don't even have to take the wheels off the car because I've done it for you, f*cker! I haven't been so disappointed by Discount in probably forever. I always get the service I expect there (maybe not top notch, but never bad). F-you. I go over to Firestone where they are happy to take my money up until 6p, unfortunately this is College Station and if you aren't looking for Chevy truck tires, you're screwed. Guess what? I give up and go to the hotel, take a shower then roll up Texas Ave. to O'Reily's to see if I can find some thinwall tuner lugnuts just in case we have to repeat this drill tomorrow. The kid behind the counter is completely into helping me get on the track. They don't have lugnuts in the blisterpacks on the shelf I need. He pours over some catalogs with part numbers until he finds something that will work. Open ended acorn tapered lugs in 1.25 pitch, 10 in stock! Thanks man!! Not only that, but he calls around to Sears and some other places and tries to find tires for me. No luck, but he does say that Wal-Mart has a big selection and I should try there in the morning. I pick up the crew from the hotel in the pouring rain and we go over to OutBack for dinner. Everyone orders a Shiner Bock but me. I've been drinking Bud Light 'to watch my girlish figure' for the last while. Becky looks at me and thinks my girlish figure has passed me by and informs me that Shiner really doesn't have more calories then that light beer stuff. I tell her it has about 147 calories per bottle, but she doesn't think so. Heh. Bud Light 95 calories, Shiner Bock? 143 (data from realbeer.com). She doesn't believe I'm a Shiner fanatic if I'm drinking Bud Light. I have to get her up to speed: My groom's cake? Shiner Bock Label spice cake. Key chain? Shiner bottle opener. Favorite college road trip? Shiner TX. Who got a pile of Z car dorks drinking this stuff? Me. My golden retriever's name? Shiner (of course! his foster dog brother's name? Molsen?!? anyway). I'd probably name my first born after it (hahahaha Mindi says nnnnno!). So we drink some Shiner and talk about setting up a State wide meet or a tt.NET east vs. west shootout or some other insane crap like that. I haven't spent time around Luis, but he fits right in with the enthusiasm level. Not to mention he really hasn't tracked much, so TWS is a lot of fun for a rookie. Set the hook and PULL! Got another one with the lefty-righty-hammer-down track action. Who can resist??
Sunday morning I loop up to Bryan to the Wally World and the Moose out front tells me the Tire Center won't open until 9:30a. It's 7:45a and the internets told me at least this auto center doesn't carry the 245-45-16 in any flavor of cheapness or expensiveness I require. I figure it's a lost leader between both negatives and head down to the track to load up and get an early start towards the house. Once I get to the track Sean is having nothing to do with me packing my crap up and heading home. We start executing the tire swap thing from the day before minus Luis' pilfered lugnuts. NASCAR would have been proud and those tires never cooled down all day. I'm watching the fuel, oil, a AF gauges like a hawk on the track. Even at 3/4 tank I'm getting pressure drop and starvation from the fuel system because of fuel sloshing around. I probably explained all this in the last installment, but the mantra is becoming 'go faster, have more expensive problems to solve'. I notice with the car filled about 1/2 way between L & H on the dipstick my oil pressure only drops in one place.. the switchback right before getting on the highbank. I could watch the pressure drop to about 20psi, but I'm in an off/held throttle position out of boost and really the drivetrain is almost running the engine instead of the other way around, so it's probably OK. Kuah did run his Motec controlled Accusump setup and had pretty impressive results according to it's logs recording the data. I'm looking forward to the refinements since I have a 3qt. accusump sitting in the garage right now I can get plumbed in and then figure out how to control the valve. I did clip 131mph on the front straight with 14.53PSI of boost according to my compiled datalogs from nProbe and Innovate. Excel can do some neat things w/ the graphing, etc...
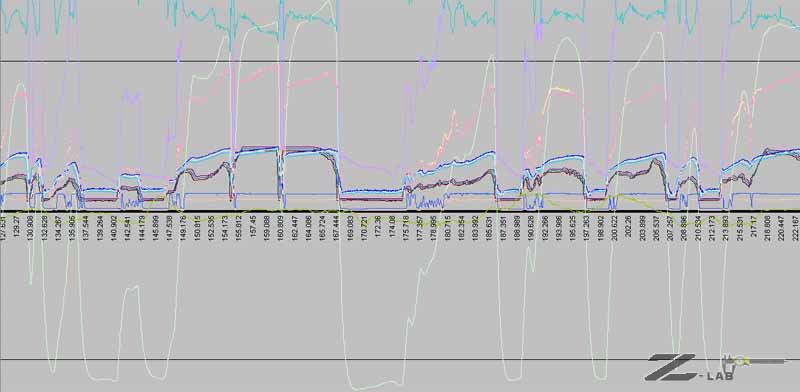
This represents the 'low voltage' items for a part of the log. The RPM, and other high values are off the top of this view.
I've also sorted out my oil consumption issue. It appears to be the driver side turbo's turbine section is getting oil leaked into it from the CHRA. The longer the car sits, the worse the burn off is. I though it was valves or something, but if it were ahead or at the combustion point, it would smoke immediately. It doesn't. It has to come up to temperature to start burning it off. I noticed a couple track preps ago it the turbo had oil on the bottom of it. But not on the return tube bolt heads or on the return tube, which would indicate the oil feed line were loose and oils is leaking externally in places where oil should be. It was only on the cast iron part of the turbo, the CHRA is perfectly clean. Great, this means the turbo has been blown since about the 3rd track session after I built the car.
Thanks to Sean, Luis, Kuah and Don for helping keep me out on the track as much as possible all weekend. Also thanks to Luis who I pilfered these images from.
I need to post some images of the dual solenoid setup (there's nothing magical about it, it's just cool looking) and some other odds and ends I've done to the car soon. Just did this to try to keep the updates timely. As a followup I did spend a few seconds talking to race/stunt/show/drift/crazycar builder Jon Ward over Thanksgiving about the oiling problem and he had a few things to look at from a general engine perspective, I'll update on that when I sort out what to do next.
8-4-2007
Someone pointed out I hadn't updated this page in forever on tt.NET. True. Point taken. There hasn't been much forward progress on Z-Lab this year for 3 reasons: 1. My wife and I have moved into a new house. New, meaning there's nothing here but a house when we moved in. Landscaping, fences, widened driveways, interior updates, exterior updates, flagstone, grass, etc etc etc have to get handled up on, not to mention settling in (my new garage is still mostly in boxes). Been spending my spare time taking care of all this *stuff*. 2. My job has been a 7 day a week thing for the last 5 months. I'm managing 2 huge (for our company at least) gov't contracts. Pushing the pencils, typing the memos, and turning the wrenches. The company still feels like a start-up at times even though it's almost 22 years old. 3. I bought a membership to a 'country club' racetrack last year as my home track, it still hasn't opened because it's done nothing but rain here in north Texas since December slowing construction. I don't think we've had a 100 degree day here yet which is amazing. The rain has also delayed everything about my house including the close date. So, the Lab has been on hold.
All that being said, I have loaded it up and driven down to Texas World Speedway to run with Aliaz, Kuah and sfarrah back in May. I really enjoy this track because it is *fast*. Rewind a bit. I was still chasing this oil pressure thing before this event. During the first day I was sitting in the grid waiting to go out and was watching my oil pressure at idle and the gauge dipped down and came back up. WTF? I had been paying attention to my oil pressure while driving because of my concerns about it. It was doing the same thing it had been doing before. After the gauge wiggle and that session on the track, I was seeing 60+PSI on the front straight. Conclusion? My sender is crap. Odd since they typically just go to 0 and that's the end of the story. I'm getting an aftermarket oil prex and fuel prex gauge to add to the collection now. Well, with a little more confidence in my oiling situation I could attack the track faster...
Kuah was in between Time Attack events with his SPL Z, so he was doing some testing and tuning. That car is amazing and I've gotten quite a few ideas for Z-Lab from it. Going faster in Z-Lab has revealed another problem with the car design. I have to keep the gas tank at least half full or it will empty the sump and starve the engine for fuel. Kuah had already seen the same problem and has a reserve tank situation in his car. Basically the OEM pump pushes fuel upward into the smaller tank and then an aftermarket pump feeds from there to the engine. Kuah has a stand-alone, so it's easier to do. I'm going to put some thought into doing this somehow with the OEM setup. Maybe make a smaller tank to begin with so it can't slosh around as much and the effective sump is much larger.
I've picked up three new sponsors this year; NISMO has me testing a part for them, Z1 Motorsports sent a set of their intercoolers for me to check out and Spongerider sent me a HI overdrive water pump pulley to put on. So Z-Lab will be sporting less white paint then the last time it was photographed. Thanks to all for the consideration of my project.
12-22-2006
It's the end of the year. Z-Lab is loaded on it's trailer with great care and is waiting to move into it's new home. My wife and I are completing a new home build (something else to take up all my free time!). The most important part is it's on an acre of useable land and the house itself has a 3 car garage. Once we get over the shock of moving into a new home (buying an existing house is easier since a lot of dumb stuff like fences, etc are already done and paid for) we'll be building a 4 car shop in the back half of the lot w/ additional storage... anyway that's further down the road. In other immediate news, I bought a membership at Eagles Canyon Raceway which is about an hour's drive from my new home. It's not open yet, but once it is it will be my home and test track for Z-Lab so I can make the car into what it's supposed to be, a true test bed. This without having to spend a lot of money on DE events, etc. I'm pretty excited about this. We toured the facility before the asphalt was laid and it's pretty impressive. Out of the 2.5 miles, about 1.5 is straights and the corners have some nice elevation changes. It's supposedly going to be FIA certified, so the safety factor is high as well. Should be a lot of fun to drive on.
I've been studying the oil issue some more. We all know there was a change in the oil capacity where '90 TTs were listed at 4 & 5/8qts. w/ filter change and '91-'96 TTs were listed at 3 & 5/8 w/ filter change. Now that I see what Z-Lab has done at the track, it makes sense. There's no physical difference between the years that I'm aware of to cause the change. It seems as though Nissan engineers found oil cavitation or aeration to be a problem and reducing the capacity by a full quart still met the cooling and lubrication requirements while avoiding the problem. Adequate for street obviously, but is it adequate for the track? I'm not sure. Something to think about. I'm going to put a pancake plate on the filter and get a pressure gauge in place to data log pressure and another pressure switch to run an idiot light on the dashboard to warn of low pressure. I've got an accusump in route, but mostly for safety and pre starting pressurization needs. Kuah @ SPL and I have been doing some talking about the actual benefit of accusump (he has it on his car already) and while it doesn't solve our specific problem it is cheap insurance. I'm very interested in wet sump solutions before making the leap to dry sump considering the cost and effort. Crank scrapers, windage trays and trap doors, oh my! If need be, I'll probably step up to dry sump when I pull the engine to swap in a built block. Unless I blow the engine in the meantime from lack of oil pressure.
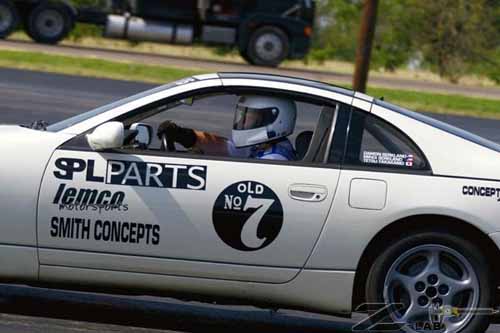
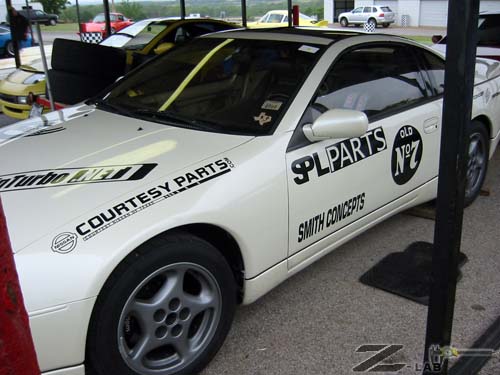
I want to thank my sponsors for making phase I of Z-Lab a reality: SPLParts, CourtesyParts.com, 300 Degree, Smith Concepts, Concept Z Performance, and Lemco Motorsports!
More to come in the new year!
11-2-2006
Back from Texas World Speedway the other weekend running with the good folks at The Driver's Edge on the 2.9 mile road course configuration (counter clockwise). Very nice weekend of driving. Since I've not been on TWS before or really driven with TDE before (they ran the track day @ ZCON'06), I got classed in the Blue run group so I would have an instructor. Renee (of bright yellow 350Z Anniversary Edition fame) volunteered for some co-pilot instruction in Z-Lab. Kinda ironic since on her very first track day I was giving her some pointers on getting her Z32 convertible around MSR. Needless to say, she's been bit and gets out to the track frequently in the 350. She runs Red group now and could slowly catch up to Z-Lab at the ZCOT Hallett event last month. Once I get the boost up on this thing it'll be more of a challenge for her. She said it corners a lot harder then her 350 and with more power on exit and straights.... Anyway... got solo'd on Saturday for blue and ran around sniffing bumpers all day doing what used to get done to me back in the blue days (get this guy off my bumper please!). Renee got me a check ride Sunday morning for Yellow and I was solo'd for second session. Running yellow was much better since the other cars are a lot faster then Blue. Only had to give passes a couple times all day, so that makes me feel pretty good about the car's performance. I can't wait to sort out some of the little things with the car and get it rolling at full power.
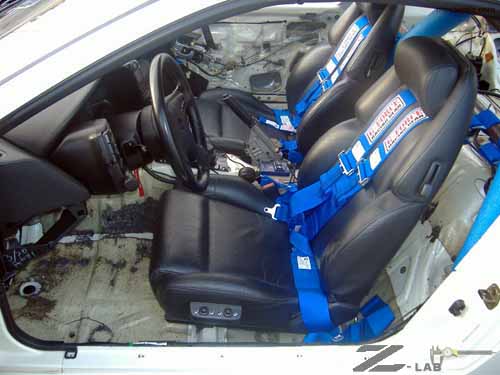
Big thumbs up on the SPL carbon fiber racing seat! Extremely comfortable compared to other full up racing seats I've sat in. The bolsters kept my legs in position and kept my knees from getting the hell beat out of them. I've also discovered the fun of pushing back into the seat a little and wedging my shoulders against the shoulder supports and really being able to manage the steering wheel because my torso is kept in place with the seat and the harnesses.
So why am I not running 15psi yet? Good question! TWS is notorious for smoking Z32s. The VGDETT engine for whatever reason wasn't designed with high G demands in mind with the lubrication system. TWS is a lot of high speed, high RPM, and consequently, high G driving. The engine loads all the oil up in the heads and then poof! nothing in the pick up.. pressure drops to 0 and the motor turns into a grenade. I know a few people that have done it out there, I didn't plan on being one of them. I was watching the crappy stock oil prex gauge like a hawk once I felt comfortable with the track and wasn't dealing with slower traffic all the time. It was odd because the pressure would drop slowly from 70 down to 15ish over the entire session, not just dip after a couple high G turns. So the last couple laps were a little slower and a lot of thought of getting off track. I don't think it's a heat thing as the oil should be at temperature after 2 laps, and I don't think it's a lubricant break down thing (20w-50 dino w/ a quart of Lucas in it) since it would be back at pressure for the next session. I was data logging as much stuff as I could, but not oil pressure like Kuah can. My LMA-3 says I clipped 1.3G lateral with 1.19G being more common out there. So I think I accomplished the high G thing, I know I was at redline a lot and speed? I was getting to 130 at the end of the front straight (I'm still a little chicken of the entrance to turn 2) and 110 in the back straight. Very nice! I enjoyed the hell out of driving another track, I just wish it weren't near fatal for the car. So... going to look into some solutions for maintaining pressure somehow over the winter while cleaning up some other details.
9-28-2006
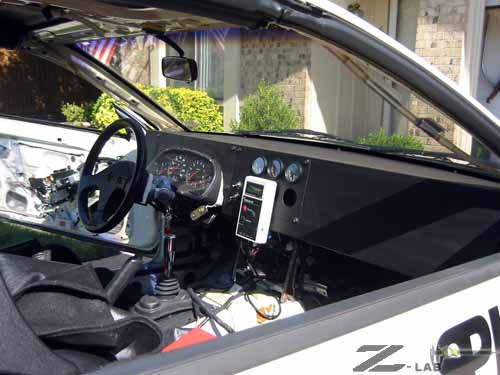
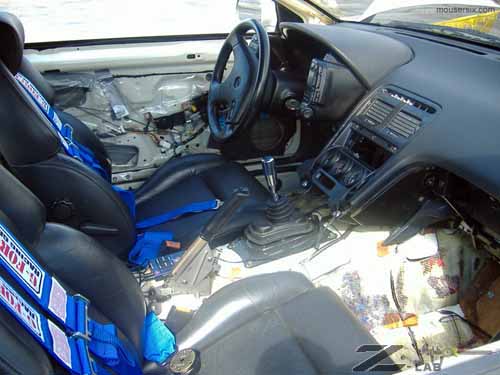
Got the dash area gutted in the last update. Then I started sorting out a replacement dashboard... something that didn't weigh 10lbs like the plastic version. Got one of my subcontractors for my real job to bend up a couple panels and make some gauge plates. Spent the day before rolling to Hallett for the ZCOT event finishing the fit up and putting some paint on it. Lightweight and fully functional. I'm still using the OEM gauge pod for now, but the side pods are gone. I figured out how to wire the low wipers to a switch (minus the extra swipe) and the headlights to a single switch, Sounds easy, but for whatever reason Nissan likes to complicate any switch assembly.
I changed the oil to 20w-50 with some Lucas oil treatment. It seems to have helped the oil consumption which I've now isolated to the valve guides/seals. There's a little over 200 miles on the new engine now of mostly low boost (6psi) after the event.
Had a nice crowd show up for the weekend event. Myself, Steve, Dave, Don, Greg, Jon, Kuah, Sean and some other knuckleheads. For once we weren't scheduled with the F'ing Mazdaspeed weekend where they won't share the track with anyone on Saturday so we only get a one day event with them around. This year we split with the Little Rock Racing Scene which seemed to be mostly, well, street racers. The event was loosely run, fortunately it was safe. Weather was nice and we got in 5 run sessions for the day. Z-Lab performed as expected. For 6psi of boost, it gets around the track quick. I gave rides most of my sessions, which is always fun... especially with Greg in the car. He probably got more bad ideas on how to drive his car then good. There's a big difference in driving technique when you have the proper tools and when you don't quite. Greg also rode with Steve and that probably solidified things. His next run session out in his car and off the track he went since he didn't have as much brake as Steve or I. Oh, well... his concourse winning car is no longer an off-track virgin. No worse for wear. Z-Lab even made a trip off which I believe ends it's virginity as well. There seemed to only be a handful of cars/drivers faster then the Old No. 7 Z-Lab on Saturday (Sean & Kuah in particular). Not bad for probably less then 300hp at the ground! I check ground speed in a few places along the track to see how I'm performing. One of my favorites is turn 1. I used to carry maybe 70mph coming out of 1 in my street car. Z-Lab can come out at almost 80. I can also negotiate the blind section before 9 (The Bitch) in the 75 range where I used to only carry 65. Having a car that's not pristine and can get wadded up will definitely put some more wind in your sail.
I was planning on stuffing in some boost jets on Sunday and run 15psi, but unfortunately the typical Hallett curse came into play. Rain started before we left the hotel and continued until right around when I loaded up and left the track at 2p. Some of the guys hung around and got some sessions in at the end of the day, I didn't see a point in hanging around. If I left the track and got on the grass, it's game over for slicks. Been there, done that almost into the tire wall in my street car coming out of 9. While it was raining I decided I would steal one of Kuah's cool carbon fiber seats out of his car... so grab a wrench, open the door and viola! He didn't even know what hit him. Guess the joke's on me as I got an invoice from SPL the next day.
Installed the driver's seat from SPL today. Very nice stuff. Seats feel really nice, it will be a relief to not have bruised sides of my knees from banging them into doors and transmission tunnels anymore. Just need to get the passenger side to complete that phase of my weight loss program.
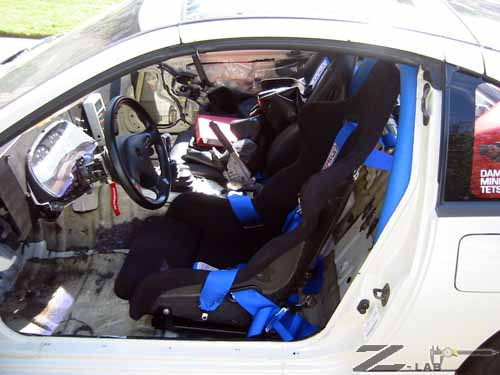
The complete assembly with the slide rails as it would replace the driver's seat is 25lbs. The driver seat weighs 63lbs according to my scale. That's about another 40lbs out of the car. I still have to corner weigh the car and see where it's at. Next up is to remove the sound deadening stuff from the interior and potentially some of the crap from the undercarriage.
7-23-2006
In preparation for corner weighting, I spent the day with niXit pulling the dash and all the crap from underneath it out. All the vents, the blower, the AC evaporator & heater core. All that stuff is a little over 40lbs of dead weight pulled from the car in a couple hours. Now I just need to get rid of the OEM seats to complete the major weight reduction program. The last places to pull OEM weight are getting rid of some of the additional wiring, the sound deadening material, and doing something about the clutch flywheel setup. If anyone needs a used heater core, TT AC system for your swap or a blower assembly email me, I'll be glad to get rid of it all.
I probably won't get back out to the track until the September ZCOT meet @ Hallett, then the RRORR in October. I'm going to see about hitting a few club events elsewhere as well, but time is limited.
6-16-2006
Been a bit, ZCON has put me behind schedule in pretty much all areas of my life. So, let's play catch-up.
I took Z-Lab over to Matt @ Lemco Motorsports for rollbar fabrication after Mayfast. He's an ORR guy as well, so he understands my requirements for the car. For a younger guy in this field, he's got a lot of knowledge and a lot of very veteran support staff (he was recommended to me by a well known car chassis fabricator here in DFW) available to him. Didn't seem like any of that was required. From looking at a couple photos beforehand and then about an hour of poking around when I dropped it off we developed a good battle plan. Next day he was posting pictures of mockup on his website and was on the phone with me double checking that what was about to happen met my needs. The more I look at the Autopower bolt in bar, the more I realize it's better then nothing, but far from proper. A few days pass and viola! Z-Lab is safe-n-sane! Lemco's coverage of Z-Lab rollbar fabrication
So, now the bar is in. My wife buys me a fire suit for my birthday and I buy a Nady motorcycle intercom set for myself for my birthday. If you're an instructor (which somehow I've become this past year), it's a great tool so you don't have to yell the whole time and can just talk to the person that's about to kill you. I decided in the best interest of safety to replace the brake master cylinder and rebleed the brakes. There's no telling how old the BMC in there is, and I'm thinking about having the Japanese drive the car/give rides when they are in town for ZCON. Probably a good idea to just get that done. Some other minor prep work goes in, I restickered the car to some extent, added Lemco to the door and cleaned up for ZCON.
I won't go into a lot of detail about ZCON, if you were there, you know, if you weren't or haven't been, you're missing out. Even without the tt.NET things going on the socialization is worth the price. Z-Lab made it's public debut at the ZCCA car show at Texas Stadium. Being TwinTurbo.NET & 300 Degree were sponsors of ZCON06, we set up a tent on one end of the parking lot and parked our cars around it. Greg's Gold Cup winning sapphire '93 and Z-Lab going on the other side. The 2 Japanese cars that got shipped over for the Ultimate Z Car Club in Tochigi flanked our cars (Tetsu's RB26 280Z and Hide's '94 Z32). We had a great day showing for the masses. Neither of us were judged as Greg has already won top honors and is retired to exhibition only and Z-Lab, well... it's not a show car. Mission accomplished! We get tech'ed for MSR the next day and bail out to prep for the tt.NET dinner & Show-n-Shine. Here's some pics (I pilfered these from Aliaz & Mousersix, thanks!)
I decided to just leave the car on the trailer at the dinner. It's very easy to load & unload with the rollback trailer, but I was far too busy with preparations. Drug the rig back to the hotel and crashed out, MSR starts early-early in the morning. Out of bed at the pre crack of dawn and head to south Ft. Worth where Motor Sport Ranch is located. For the uninitiated, MSR is a country club for motorsports. You pay an initiation fee, monthly dues and 'green fees' for track session use. They now have 2 separate circuits that can be connected for 3.1 miles of circuit. The new circuit is shorter and twistier. It's suited to sport bikes, miatas & whatnot. Not GT/heavier cars like the Z32 in my opinion, although it might be fun to pitch it around there a couple times (I got to ride with one of the track instructors in a Z33 around it drifting, quite fun). Anyway, we pile in, set up our tent & banners (tt.NET & 300 Degree partnered w/ Toyo Tires to sponsor the MSR track day), unload the Lab and gather the Japanese around. I was given an instructor's armband so I could hit the track whenever with the Japanese, which was very handy. I trounced around with the red (race/instructor) group in the morning. I'm running a whopping 8PSI and not getting smoked, so I'm feeling pretty good about that. Later on in the day I decide to drop back to yellow group to run with the Japanese & not press the car too hard. It's still smoking (not sure I've addressed this yet, I will in a second) a little & I'm concerned about it. Overall the car performs well in all categories. Stock turbos are very responsive & I'm probably putting down 270 or so to the ground (the engine has very little modification yet). The suspension kicks major ass as do the brakes and tires. I'm basically driving a scaled up miata. Not a lot of power in the straights, but not much scrubbed speed in the corners either where it counts. I constantly found myself gaining huge ground in the corners on the car in front of me. Quite fun!
Friday morning was the autocross & oval lapping at Texas Motor Speedway. It was run in the hot grid method, which means you finish the course, get in line with the other 5 people in your group and keep cycling through 4 runs. This keeps the tires & brakes hot with consecutive runs to keep the brain hot as well. I actually got more then 4 runs because a red flag stops the course and everyone gets a rerun that was on the track. At conventions there are a lot of novices (nothing wrong with that at all) and in autocross like this the classes are mixed. 'Fortunately' for me, I had a novice in front of me that was having a hard time navigating the cones, so I ended up doing a couple 1/2 course runs. I had the front part down once it was all said & done. I scored a 75.814 which was good enough for 3rd in the race class and 4th overall out of 67 participants. I also hooked up with the last run group of the day for oval lapping on the actual track. I've done this a time or two before, it's always fun to roll with a pack of Z32s though.
So, now what? Well... there are a couple questions I got asked repeatedly during the convention, how much does it weigh, how much power, etc. I'm going to take it to get corner weighed and dyno it at some point so I can get baselines. I'm worried about the smoke problem. At first I thought it was a valve seal because it would smoke on startup and then burn off & be OK. Now it seems to burn oil all the time. I think I've killed off a quart in 3 days of track time. The smoke isn't obscene, but it's there most of the time in a minor amount. I'm sure running minor boost & tracking for the first 118 miles of the engine's life didn't help. When I started the build I was just going to roll on the street at night and get 100-200 easy miles on the car to break in the clutch and the engine. No such luck. I might be faced with a rebuild in the near future. I figure I can start in on this other short block I've got & start getting it ready for combat. Next step is to pop the plugs & see if there's any signs of impending mess in there. Perform a compression/leakdown check, etc. I'm also going to update the ECU to a '95 w/ the BikiROM in it for tuning.
5-16-2006
Wrapped up the Lab & took it to the track. After getting the water leak fixed & the rear bushing problem solved I started seeing some light at the end of the tunnel. Well, almost. Mr. Murphy decided to stop by again & make sure I stayed busy up to the bell.
Wednesday I took the day off from work to get Z-Lab prepared for the weekend. Discovered my helmet didn't meet spec. I thought I had a SA2000, which it was a 1995. No good. So called my buddies at Saferacer.com and wanted to order a new G-Force helmet, they didn't have my size in stock, have to upgrade to the Force Air one with the vent tube on the side. Guess that's an excuse to replace the side quarter glass with lexan & a NACA duct. They'll ship it overnight so I'll have it for the weekend. I also ordered some clips, eyebolts and bolt plates for the harnesses the week before, which I was waiting impatiently for. More on this later. Got the car aligned with Guapo at the local NTB. Cheap way to get some baseline numbers and keep from chewing the tires off. Car drove like a car afterwards. Really pleased with the results. The front has about -2 camber and the rear is a little less. I'm going to need some camber arms on both ends to get that all dialed in. Something for the next round of mods. Once I get the car home, I start having some drivability problems. Hard starting, etc. I have the wide band installed now, so I take a drive and it's leaning out under throttle. I get back to the house and install a fuel pressure gauge. That's obviously the problem here. Fortunately, I got a second set of compression fittings for the damper & regulator to adapt them to the AN-6 fuel hose. I talk to Guapo & he mentions I might want to replace the check valve I forgot to replace last week when I did the fuel pump. Go to Courtesy & get a new regulator, damper & check valve. Damn, check valve is sold out & I need to have this wrapped Thursday. Guapo just happens to have a new one he was going to install on his car since it slowly loses pressure. I bum the parts from him & install the check valve & the regulator. Bingo! The check valve solved the problem, but I went ahead & replaced the regulator too. I'll do the damper later. I take a shower and start to design & cut stickers for the car. My trusty laptop craps itself. Thanks Murphy! Thankfully I had just saved the artwork I created for a logo. I have to move my operation to the office with the desktop. I start getting other odds & ends tidied up but still don't have harness hardware that should have been at my house Tuesday.
I haul the car to the office on Thursday to get the last big checkbox of the week completed, a harness bar. I call Saferacer to find out where the hell my parts are, they get me a tracking number. I find out they are local and should be delivered Friday. Great. I want to be on the road by 3p. Nathan at my office does a lot of 4x4 stuff and is a competent MIG welder, so I enlist him to help me fab a harness bar. We cut out two plates to go on the strut towers & then angle cut the pipe I bought earlier in the day. Lots of grinding and a little welding later, I have a suitable harness bar for the weekend. Definitely not a final solution, but it will get the job done. All major checkboxes are complete! All that's left is to clean the car and get the harness stuff done. My cool helmet arrived on time.
Friday is another day off from the office & my wife is getting out of work around 1p so we can probably be on the road by 3p. Whatever. Car is still on the trailer from the night before and will get unloaded at the track, I do all my remaining work with it strapped down to save time. I start off by cleaner waxing the car so it looks good and the stickers don't permanently adhere to the paint. This thing really is a nice car. I get the stickers cut, which is an effort since I can't use my laptop. I'll apply them at the track. I have to chase down the UPS guy on his route to get my parts early and start drilling holes in the floor for the eyebolts. We'll rebuild the harnesses at the hotel tonight. I count parts and I have everything I ordered, so that's a good start. The plates they sell are nice and saved a lot of time for me, but I was a little disappointed to see the corners were sharp. Anyone with 1/2 a brain would realize any mounting plate for harnesses or rollbars or seats should have all the corners rounded off to minimize the ability of the corner of the plate to cut through the sheet metal it's supposed to not pull through. I spend 15 minutes rounding corners on the belt sander. Oh well, beats cutting all of them & drilling holes and rounding corners all together. Get the holes drilled and am satisfied I can do the rest of the installation at the track tonight. I just want to get there before the sun sets. I deal with some other odds & ends & get the truck loaded. We're on the road by 3:45p, which is too close to 5p on a Friday. Traffic sucks for the first hour or so getting clear of N. Dallas. I stop in Van Alstyne to get race gas out of the pump. Z-Lab is topped off and ready for battle! The rest of the trip up is uneventful, although the weather doesn't look too great. We get up to Hallett and get unloaded and situated. I lift the rear of the car and get the harness hardware installed. We get back to the hotel in Sandsprings and Guapo & Aliaz arrive a few minutes after. We agree to meet for breakfast at 6a-ish. I'm trashed from the week's work & the 4.5 hour drive up there. I pass out early.
Saturday morning and the weather looks like complete crap. It's drizzling in Sandsprings. Great, I'm not at all geared up for wet weather driving. I'm not even geared up for wet weather living. I packed shorts & sandals, not rain gear. We eat breakfast & head towards the track. Stop by Walmart (last resort shopping) and get some tape & an umbrella. Make it out to the track for the driver's meeting. Luckily it hadn't rained at the track yet. Guapo & I hit the track & get some initial laps in. Car can't help but be in boost, which I'm not completely thrilled about since it's only got 12 miles on the rebuild. Nevertheless, it's performing well. Aliaz is co-driving Guapo's car and he's out next. It starts to rain during his session & he closely avoids an accident in the last turn coming into the front straight as a car spins out in front of him. The rain continues & we decide to just head back to the hotel for the afternoon since there's no way the track will dry anytime soon. Dinner was at the new & improved Rib Crib by the Wal-Mart. Not as much character as the old one, but still the Rib Crib. We get a call from Tu & he's going to get off work at 7p and drive up that night to track his car on Sunday. Someone is hooked!
Sunday starts the same as Saturday. We get to the track and it's raining a bit. I run the car through the line to get tech'd again. It's smoking more then I'd like, but it burns off after a bit.I take a lap or two and the track is slick, so I bail out and park. The next session I run the car until I get some brake shudder. Take the car back to the pits and rework everything about the front brakes. I get to take the car out for the next session. By this time the crowd has thinned some and the track officials were combining run groups, as usual red + yellow = fun. I launched out of the grid as the first car was coming around on lap 1. I couldn't stay ahead of him since I was still warming up tires and brakes on my first lap, so I let him around on the first passing straight. Felt pretty good about it since once I let him by, he didn't run off & leave me. I kept him in site for a long time. I still wasn't completely leaning into it and only revving to about 5100 or so RPM. He was getting away in the straights but not on the corners.
Current Mods List:
OEM shortblock rebuild parts from Courtesyparts.com
OEM longblock rebuild parts from Courtesyparts.com
OEM timing belt replacement kit from Courtesyparts.com
NISMO 740cc injectors from SPLparts
High Performance Fuel Rails from 300 Degree
'95 EFI harness
EGR removal kit from 300 Degree
NGK PRF6bllb spark plugs
Stock turbo rebuilds by Forced Performance
Specialty Z downpipes from Concept Z Performance
Unorthodox underdrive pulley
Centerforce Clutch (slightly used)
SGP steel braided clutch line
2.5" test pipes
3" B&B dual oval tip cat-back
Stillen intake
Hard pipes from Smith Concepts
Short shifter + solid bushings from SPLparts
Flaming River external battery cutoff switch from SPLparts
Battery relocation kitm from SPLparts
D51 Optima battery from SPLparts
300 Degree nProbe data logger
Innovate LM1 w/ LMA3 wide band O2 sensor with data logging
Koyo radiator from Concept Z Performance
Summit overflow tank
Coil overs from SPLparts
Front camber correction kit from 300 Degree (only the bolts, spacers left out for -2 degrees camber)
Stillen anti-sway bars from Concept Z Performance
ES rack bushings
NISMO lower control arm bushings
Tension rods + cooling deflectors from SPLparts
RMS Willwood front brake kit
Brake brace from 300 Degree
Hawk Blue rear pads
Motul brake fluid
4 TT rear wheels
4 Toyo Proxes RA1s
HICAS eliminator kit from SPLparts
OEM NA power steering bracket/pump/reservior/hoses
Power steering fluid cooler
Custom rollbar from Lemco Motorsports
GForce 5 point harnesses
Overall, I'm pleased with the setup so far. It didn't explode or have to get towed. Definitely a plus. I wish I could get some more track time in before ZCON, but at least it's somewhat shaken out. Power feels as expected for 'safety boost' levels. I'll up the boost and run it on the dyno here shortly.
Wednesday I took Z-Lab over to Matt @ Lemco Motorsports for rollbar fabrication. He's worked up a solid plan for getting a bar properly installed into the chassis, so that's happening right now.
5-2-2006
Very busy week in the Lab. Actually drove it up on the trailer to haul it out to a buddy's shop to get those bushings out of the rear spindles. Ended up screwing one of them up. Got the other out without much incident. Steve @ Courtesyparts.com ordered both an NA & TT rear spindles. The NA has the toe rod bushing already installed (no HICAS). Unfortunately, the parts weren't going to arrive until today... which would have made things uncomfortable. SniPer SR71 (Dallas) had an extra TT one, so I picked it up on Friday and installed the new NISMO bushing from SPLparts into it for the HICAS eliminator bar to get installed properly.
So now all the fun starts. I get the radiator & stuff installed and fill it full of water. I run it up to temperature w/o pressure to bleed the system. Everything seems OK. Then a leak (remember, leak with no pressure) appears some time late. Looks like the water is coming from the rear main seal area. Sounds like a freeze plug leaking. Drop the transmission, remove the clutch & flywheel. Looked like the middle plug was leaking. I didn't install the AC compressor, so access to the block drain plug is right there. Make a mess with coolant everywhere, most of it goes in the bucket, the rest into the big drip pan I use (clothes washing machine drain pan). Yech, I hate that stuff almost as much as transmission fluid. I get new freeze plugs from Courtesyparts. Install it with a light smear of RTV on the edges and then a nice ring of it on the outside. Let it sit overnight & pressurize the system with a tester in the morning. Pressure drops slowly, so I assume the gauge is a little leaky. Start working on the rear spindle situation. After a bit I notice water leaking down the floor. WTF? Start looking at the rear plug again and see water coming over the TOP of the block, stick my fingers up there & it's wet. Damn... how did I miss that? Well, it's either a gasket or one of the 3 freeze plugs on top of the block. double damn. Have to remove the lower intake to see. Thankfully, I've assembled the engine in a very maintenance friendly way. No front covers or backing plates on the timing belt, which means removing the lower intake is not an super involved thing. Get the plenum off in another 20 mins or so, I've never removed the lower intake with the engine in the car. That's a pain even without dealing with the timing belt situation. Set the engine to #1 TDC, clamped the belt to the sprockets so I wouldn't loose timing. Stuck a bolt through the intake sprocket into one of the backing plate holes to keep them from moving on the passenger side.Didn't know you basically have to break the water lines in the rear of the engine to get the lower intake over the rear studs. PITA. Anyway, get the lower off in about 35 mins to see a nice green swimmingpool of water in the valley of the block. That explains the delay. The coolant had to fill the first pool, then overflow to the next one to the rear, then off the back of the engine and around the rear main seal and to the floor out the drain hole in the bellhousing. Poop. I redrain the block making a second mess of everything. I let it set for a bit to see if the fluid level in the middle swimming pool drains out or not. After about 30 mins, it's drained an eighth inch or so. I pop it & replace it with the extra plug I got from Courtesyparts. RTV that one up the same way. Put it together and pressurized things and it held pressure this time. Good. I decided since I had the driveshaft out to replace the CSB. Went easy until I went to thread on the nut. For some reason it wouldn't thread. Examining the threads & everything looked AOK. ended up having to file off the last 2 threads to get it started. Got the wheels painted and the race tires mounted. Got all that stuck on. Checked a bunch of other stuff out.
Finally went out and drove it around the block. No major complaints besides the lack of exhaust... all I had were 3" test pipes (.) I finally had to break down and cannibalize the Green Queen. The 2.5" test pipes and 3" B&B cat back are on there as of tonight. Sounds tough. I clay barred it and did a quick detail. Hell, there's a nice clean car under there!! Drove it around tonight with the exhaust on. It's twitchy as crap w/o the alignment done. I have a slight whine in the transmission... but I've got 4 more, so I'll drive it until it craps out. Feels very responsive for 6PSI of boost. Alignment happens in the morning, then I'll really be able to concentrate on the feel of the car. Get the harness bar installed in lieu of a roll bar for this week (not digging that, but it's my only option). Some other odds & ends. Wax it, put stickers on, etc. Anyway, the Lab is almost ready for show time!
4-23-2006
Time for the obligatory IT'S ALIVE! Worked over the weekend getting things cleaned up a bit. Put in a new fuel pump Friday night & some other minor things got lined up. Checked fuel pump operation and ran some gas through the lines, everything seemed cool, so I buttoned it all up & went to sleep. Got the final details in place the next morning, turned the key at noon on Saturday (right after The Rant ended it's 10 year run on KTCK 1310 The Ticket.. sad day for me). Started right up with a nice roar (I rarely have everything done on first start. Basically the engine is in, the required electronics are connected, the oil & vacuum systems are closed up. No accessories, no exhaust, no coolant, just what's required. Oil pressure looked good and there was a little smoke from all the lube getting burned off in places. I spent the rest of the day installing the accessories, radiator, etc. Today I spent a little time this afternoon putting the front facia on enough to back the car out & wash it. Here's how it looked on it's maiden drive out of the garage to get washed. Amazing how dirty it was, it cleaned up very well!
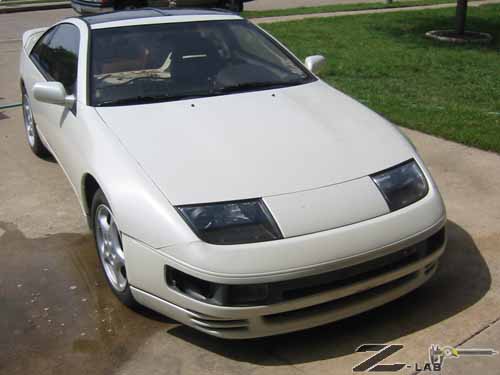
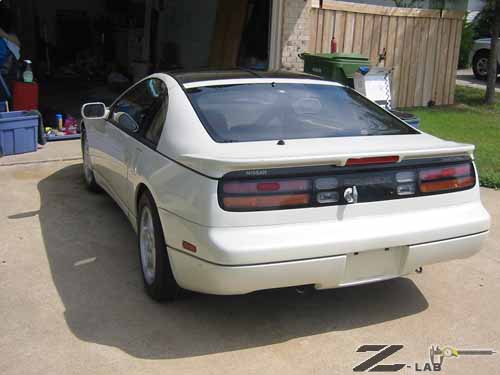
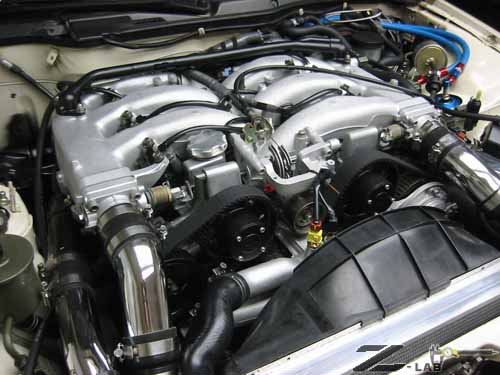
Hopefully it will get down to the rollbar guy in the next couple days.. I need it to go there & get an alignment of some sort done. I'm still battling the HICAS bushings in the rear. I think I'm going to have one of the guys at my office torch them out somehow. I got the pivot bit cut off so I could at least bolt the arms up, but I really need to get those done before going to alignment. I also need to work on proper ride height, but I need to get my wheels & tires done up before then as well. So I've got a little more work to do before getting it out on the track... but I'm damn close now!
Thanks to all my sponsors who've helped me with the project so far:
SPLparts.com, CourtesyParts.com, 300 Degree, Smith Concepts, ConceptZPerformance.com, TwinTurbo.NET and the dozens of people that have answered questions, sold/donated parts, and spent hands on time for me.
4-19-2006
OK, weeks worth of convention for my real job is out of the way. Little bummed as my dad will be driving his Saleen mustang in the BBORR this week, while I'm trying to get my car wrapped up for Mayfast in a couple weeks. I really wanted to run, but I didn't have enough time to get everything squared away.
This past weekend I got 3 solid days of work in on the Lab. Things are starting to come together now! Engine is in & ready to run. The Smith Concepts hard pipes are very nice. I've installed a lot of hard pipes over the years and his are the best fitting I've worked with. Most of the others try to make the pipe become seamless with the ones it's mating to (like there's no gap whatsoever), his have a little space which makes fitment a easier. The couplings fit properly and there's enough room to actually slide them down the pipes to make installation a snap. The others I've worked with in the past would have bends right at the ends and the couplings are a size too small & don't like to move to begin with, much less slide down the pipes and allow a quick installation. At least they are easy to work with during maintenance, it's always a whipping to have to screw with hard pipes for 10 minutes to get them off and 20 mins to get them back on. Thumbs up for Smith Concepts! I had to chase down a vacuum leak on the fuel rail (lower insulator). That means I got to exercise what I just mentioned. Easy off, easy on... I rolled over the lower insulator on one of the injectors like an 'amateur' as Guapo told me. Smartass. The hose joining the rails together is a hair too short so there's a little tension there & caused the rear lower insulator to not seat properly. Got that all squared away. Also discovered I can get the plenum off in about 15mins now that everything is cleaned off of it. Also gives me an excuse to maybe put on those black covers that go around the spark plug holes. I though they were crap until I built the engine w/o them. Then I discovered they do serve a purpose... they make it a hell of a lot easier to put in the coil packs. They serve as alignment guides to get the tip onto the spark plug. It's annoying to put them on with out those parts in there. Got the clutch bled, the brakes bled the temp wheels & tires are on. Ready to load up on the trailer and get over to the roll bar place to get that work done. I was going to start it up last night after I fixed the leak but I've discovered my fuel pump doesn't work. I ran 12V directly to it & nothing. It ohms out properly, but I think the pump is gummed up which I was hoping wouldn't be the case. Got the front fenders partially back on, it almost looks like a car & not an organ donor anymore!
While it's in the shop getting the roll bar done, I'll get the wheels & tires done up & start in on sponsorship stickers...
4-3-2006
Time is at a premium lately as I'm closing in on some business deadlines. I did get a couple nights this past week & all day Sunday to work in the Lab.
I'm about 3/4 way through installing the remote battery setup from SPLparts. Pretty trick stuff. Got the power cutoff switch from SPL mounted on the rear center panel... so it's a real racecar now! I'm having a hell of a time figuring out how to remove the HICAS bushing/kingpin things on the wheel hubs. I have to replace the TT version with the NA style to make the SPL toe arms work. I really don't want to dismantle the rear of the car to take the hubs off if I don't have to. If anyone else has any tips on this, email me please! The engine & transmission are mounted in the chassis now. It's starting to look like a real car again. I installed a power steering cooler where the AC condenser was. That should keep the fluid from boiling at the track. My starter is kaput, so I got an extra b0rked one from Guapo.. between the two I should be able to make an operating unit. Got a NAPA alternator on here. The one I had, it's bearings were crappy. Lots of new shiny parts on the long block. Put the driver's seat back in and finished up the brakes... just need to bleed them now. I hope the BMC is worth a damn. I'll probably end up getting a new one just because.
The only big details to take care of at this point are the HICAS arms, getting the roll bar installed, finishing the wheels & tires and alignment/cornerbalancing.
3-23-2006
As a follow on to the last update, BBORR has slid off the scope. Too much risk right now. I'm not going to have the proper safety equipment in place and that makes it a no-go... also I don't have time to do a complete shakedown of the car before the event. Not smart, so I'll have to shelve it for this year. Road Runner ORR comes up in October, I'll be fully prepped and shaken out completely by then. Looks like the first event I'll hit is PCA's Mayfast at Hallett, OK with a bunch of other tt.NET guys.
Yugo Bernie provided the missing PS pump bolt, thanks Bernie! Something else I can cross off the list. Replaced the boots on the steering rack & got the front suspension done up. SPLparts provided the super sexy SPLparts coil overs, tension rods & air guides for the front. CZP provided the Stillen sway bars. I have to say I'm impressed with all these parts. The coil overs are 15 way adjustable and anodized blue (which I guess is the accent color for the car now... blue shocks, blue fuel rail fittings and blue harnesses in the interior). The SPL tension rods are pretty primo looking and have threaded holes in them to directly accept the SPL air guides... my Wilwood brakes desperately need the ventilation. Out of the dozen+ sway bar installations I've done over the years, I don't think I've ever installed the Stillens. Have to give them thumbs up. Compared to the Suspension Techniques bars I have on my street car and have installed all the time everywhere else they are a much better kit.. at least on the front. Haven't made it to the rear yet. I might change my tune by the time I'm done. In the end either kit probably performs the same, but if you have to do the installation yourself, or you like your mechanic, then get the Stillens instead. The EFI harness has been cut back and reloomed for PTU relocation and rework of the CAS & temp sensor wire routing. Few last details on the long block before it can go back in and the Willwood brakes will be installed to polish off the front end of the car. Spent part of the day today grit blasting the wheels. I need to get them painted/coated and get the Toyos mounted for combat.
3-19-2006
Grrrrrr... things aren't moving as fast as I'd like. I'm getting delayed in all directions it seems. 4x4 places just can't do what I need to get done. Flipping a jeep on it's head doesn't incur the same amount of force as wrecking a car @ 140mph. Welds that are not nickles are not acceptable. I can do some of the welding I've seen at local shops myself and I *am* an amateur welder. I can make a nice bead from time to time, but nothing I'd call professional. I'm really surprised at the amount of crap I've run across so far. At least I'm on the right track now. I found a shop that not only does cages for serious use, but they are also ORR guys. Bonus, finally someone that understands that 1.5" tubing just isn't good enough & doesn't tell me 'well what rule book are you reading? SCCA doesn't require that.' Sorry, I never said anything about SCCA & if a customer tells you they want a 2" tube bar, don't freaking question them like they are idiots. They might be, or they might not be reading out of the same rule book you think is the highest power. Anyway... the lead time on the bar has grown substantially to get one done the way I need it done. But that's OK. I'd rather do it right the first time then have to do it twice and the second time is a rework at best because the floor's butchered or whatever.
The other factors slowing things down unfortunately is real life. We (Dallas Z car folks) lost one of our long time members in a fight against cancer the other week. One of my wife's best friends lost his mother this past week. So I've been to two funerals in the past couple weeks. Not to mention real work will be pinching my schedule the next couple weeks as I build a mockup of some equipment for our biggest convention of the year & deal with the overall presentation of our booth.
On other fronts, the long block is about done. Just a few minor details left to attend to. The suspension is about 3/4 complete now. I'm almost at the point where it just needs to stop coming apart and start going back together. The SPLparts Battery relocation should be completed this week. All the SPLparts suspension bits are going in as well. My Koyo radiator and Stillen sway bars arrived from Concept Z Performance this past week, so those will go in the mix shortly. Courtesyparts continues to supply bits and pieces to complete the long block and surrounding engine bay. Got my G-Force harnesses from Racerwholesale.com. Everything is slowly starting to come together. I need to get the chassis rolling/running very soon so I can get the thing over to the roll bar guys and get that knocked out... then off to be corner weighted & aligned properly.
3-13-2006
Another week of Z-Lab has come & gone. Guapo and I went to a local 4x4 place to show them the autopower rollbar during the week. Guy there seemed to be a capable fabricator, but his welding left something to be desired. It's one thing to dump a 6000lb truck on it's side and not dent anything, it's a whole different story to crash a car into a ditch at 160mph. I'm probably not going to survive, but I don't want it to be because of a couple shitty welds. Looking at other options now.
I was really worried about the fuel tank. The car had been sitting for 5 years since it's last registration sticker. Finally got around to draining the tank. Fortunately, there was about 10 gallons of stale gas in the tank... hopefully this means the pumps aren't shellacked. Got the SPLparts coil overs installed. Took a bunch of measurements for initial setup, hopefully when I get to corner weight the car, I'll get a better idea of baseline for them. Got the IC piping cleaned and pressure checked. I also soldered in some 1/8NTP fittings and some 1/4 nipples for hoses. One set in front of the IC, one set after. I might be able to do some temp/prex checking on different ICs this way. Got the OEM oil cooler flushed out. Yugo Bernie is sending me a pivot bolt for the PS pump, so I can cross that off the list. 300Degree front camber kit bolts went in w/o the shims (I want about -2 degrees camber). I wanted to leave myself some adjustment space if I wanted to shim out for some reason. I did quite a bit of cleaning... looks like one of the power steering hoses had leaked severely at some point, everything forward of the reservoir on the passenger side was covered in years old fluid & dirt. I cleaned up most of it while I had the IC pipes out. Been working on bending some tubing for all the turbo water lines, also found a 3/4" hose at Autozone I can use for the heater bypass. I could just cap off the tubes, but that risks trapping an air bubble. The alternative is to find a pre formed hose that has a 180 in it and use that with a restrictor in it. I'll list the hose number when I make what I found work. Just need to put the side plates on the plenum & it'll pretty much complete the engine, then drop it in. Courtesyparts.com has supplied all the OEM parts for the longblock, thanks Steve!
3-5-2006
Guapo came over today to help out with the project. In the limited amount of time he had to share with me we got quite a bit accomplished. We stripped out the entire interior except the dash & the door panels first. Spy photo! of Guapo's antenna removal technique. I've pretty much got a complete black interior available if someone wants to do an interior color change to get rid of that tan/blue/red interior. Condition is very good for 15 year old parts. If you're interested, email me. We installed the new '95 EFI harness too. After Guapo split, I got the SPLparts short shifter installed, ES rack bushings, removed the old school Code Alarm, and pulled out part of the IC tubing to make sure the water that got in the recircs isn't also down in the intercoolers and other places it shouldn't be. Fortunately everything is AOK. Guapo brought over another set of recircs to install since I'm betting the original ones are rusted junk.
3-2-2006
Got the turbos installed. Forced Performance did a pretty good job from the looks of them, but I did find two minor mistakes. The clocking was off on one turbo while spot on for the other, and one of the waste gate actuators wasn't clipped on the gate arm. Neither are a big deal to me, but to someone that's just trying to make it through a weekend and doesn't have a set of big ass snap ring pliers to help reclock the turbo, it's painful. Found a Z car guy (280Z) at a local off road shop that I'm going to talk to about fabricating a rollbar. Guapo & I will head over there next Wednesday to show him what the Autopower bar looks like installed. Got a set of chrome hard pipes w/ black couplers from Scott Smith @ Smith Concepts... definitely adds some style to the build! Bead blasted the '95 CAS housing to make it look good. Got the bearing Loctited into the front housing and discovered TPS bolts work nicely to hold it in place like the screws I drilled out earlier. Got the 300 Degree fuel rails through the first round of pressure checks this morning for the injectors and finished up the fittings and hoses tonight. I'll prex check the whole system in the morning. Then I can finally get the plenum installed. Started trying to grit blast my yellow wheels. Discovered that cheap Hotcoat stuff from Eastwoodco really isn't too bad. It's going to take quite a bit of work to strip all 4 wheels. I'm not sure if aircraft stripper will work on that stuff or not since it's essentially melted plastic & is probably chemical resistant.
2-26-2006
53 days to BBORR... I've still got a lot of work to do.
Rained like 4 inches yesterday. Today it's like sunny & 70. That's winter in Texas! Good news is I ended up having to work over the weekend, so I picked Saturday in hopes it would clear up a bit on Sunday. I got the EGT sensors run into the exhaust manifolds to measure turbo inlet temperature. I decided to be slick and drill through the 300 Degree EGR delete plug and put in the LH sensor there. The RH sensor was done the old fashion way. Got some other longblock work done, but not as much as I wanted. Got the wheels pressure washed. They aren't spotless, but they are somewhat less brake dusty then before. I was going to do black, but have decided to go with a dark silver if it's available in Polane. Got the chassis back on the ground and rolled into the cleaned up garage.
Start tearing out the interior & get the suspension sorted out while finishing up the longblock next.
2-24-2006
Cold and wet won't quit around here. Supposed to be rainy Saturday morning. I'm going to try to get the chassis in the garage this weekend so the weather isn't such a concern. Got my turbos back... they look great, we'll see how they perform. Got a 6000 series bearing for the front of the CAS, so I can get that rebuilt over the weekend. Also Steve Simmons donated a set of GReddy EGT gauges and a boost gauge, thanks Steve!! Since I haven't installed the turbos yet, it's prime time to drill the holes for the EGT sensors beforehand.
I'm looking for someone in the DFW area that can fabricate a rollbar for me. I really don't like the autopower bar, and since I'm going to strip the interior out, I can get the bar closer to the frame and maybe keep some amount of rear window visibility. If you know of someone that's done a rollbar before and is reasonable on cost, my email is at the bottom of the page.
The other thing on the list is to get my wheels cleaned up and Polane paint them Black... instead of the crazy yellow I have right now.
Lots of work to do and about 50 days to get it done now. Really need to have the car up and driving in the next 3 weeks.
2-21-2006
Cold weather in Dallas has slowed me down over the past week. I hate the cold. I've piled up parts around the longblock to finish installation, just waiting on turbos... I'll get into that once it's resolved. Got my fittings for the 300 Degree fuel rails from Jegs, so I'm putting those together right now.
Also I had cut up that '90 CAS I had to see how the insides worked before ruining the '95 CAS I've got. Learned there's a little keeper on the inside of the '90 to keep the front bearing in place making it very difficult to dismantle it from that side. You can see the ends of the two screws closest to the center of the CAS front cover. With the keeper in place, the bearing can't be pushed out of the front cover and the bearing/shaft are assembled at thermal differences so it takes a LOT of force to get them to come apart once they are the same temp. I'm told it takes a 20 ton press. I don't quite believe it, and I don't have a 20 ton press to find out. So I started thinking about how to dismantle this '95 CAS that needs a new front bearing. There's one other difference between the '95 & '90 CASs that makes the '95 more difficult to work with besides everything on the shaft is press fit... the very center of the front cover is aluminum alloy too. The '90 is plastic (with the Mitsu diamond star) and easy to get through. So I figured I'd drill a 1/4 hole offset a little bit through that center cover, then drill through the inner race on the bearing to make it give up it's death grip on the shaft. Well, got the hole drilled through the cover and revealed the exact area I wanted to see on the bearing. Tried to punch the surface to start my pilot hole into the front of the race... and... should have known it would be hardened steel. Punch is dulled, drill bit doesn't care. So I figured I would drill out those two screws in the keeper and see if I could get the bearing to let loose of the front cover instead of the shaft (which obviously isn't going to happen). Started drilling into the screws on the drill press for nice straight holes. Eventually I feel the bit go through the screw on one side and then on the other the screw seems to get stuck on something where the part is trying to pick up the vice and go up the bit. So I stop the drill and rotate it backwards to extract the bit. Once I get it off the press, I tug on the CAS shaft a little just to see if the screws will let go of the keeper and let me get the whole thing apart. BINGO! Shaft pops out. Turns out the '95 type CAS doesn't have the keeper. The OD of the bearing has a little loctite on it to glue it to the front cover and the 2 screws just have washers on them to hold the bearing in place. I guess when I was drilling out the screws, I actually backed them out of their threads! So not all I have to do to finish the rebuild on this CAS is cut off the bearing, put the new one in the front cover with some screws and set the shaft back inside. Done!
2-13-2006
Spent most of the afternoon outside working on the chassis. Pulled the fascia & both fenders off. Found 2 things of interest outside of the Cheetos bag in the aux fan. On the liner for the passenger side, I found an ignition key. On the driver side I found the missing washer stack for the lower intake manifold inside the fender in some leaves. Great... glad I did that. Dug all the leaves out of the cowlings and removed the AIV crap from inside the fenders. Starting pulling all the AC lines from inside the under hood. I'll have all the stuff out from under the dash to go with it in the next couple weeks. If you're interested ALL the AC stuff for a NA->TT conversion, let me know. I don't have a use for it. Detached the HICAS stuff under hood too. I'm going to leave the 2 lines running to the rear of the car intact for now. I still might try to use them for the diff cooler setup in the future. Of course, there's always a step backward. Found the intake T was missing, so the intake has been exposed to the elements... meaning the recircs are full of water and probably rusted to crap. I'll prex test them, but I'm not hopeful. I'm going to end up pulling all the tubing off for the intercoolers and clean it all anyway.
Spent the rest of the afternoon cleaning up the garage so I can get the car in there. I really need to get all this wrapped up in the next 4 weeks or so, it needs to go to a chassis shop to have the suspension aligned and corner balanced before I take it to BBORR. Then I'll have some time to get some finishing work completed before loading up and heading out.
2-12-2006
Dropped off the turbos at Forced Performance for a simple rebuild. I can't quite afford a full Stage I rebuild right now. Stock turbos are fine, it'll have enough power to get done what I want to do for the moment. Next time I pull the engine, it will be for some other updates at the same time, so no big deal really.
Decided to use paragraphs now.. pretty cool, no? I also rotated the newest update to the top of the updates list.
Spent all day building up the long block and doing inventory. Discovered a few niceties in my bins of spare parts! I've got a complete set of brand new turbo oil/water lines & I found a NA power steering pump and bracket. I'm going to roll with that for the moment... my time table is getting shorter before my first event and I'm trimming out any distractions for the moment. Like the turbos, the diff/trans pump will be a round 2 thing. I'm going to have enough fabrication to do. As far as the long block, it's mostly done. Just need to stick the fuel rail and plenum on the top (haven't gotten injectors yet), and the turbos on the sides when I get them back from FP. I made a few changes to the standard build along the way just to mix it up a bit and make working on the engine easier later on. As far as power plants, it looks pretty tough right now... I'll post all the pics before I dunk it in the engine bay.
Next step is to start stripping down the chassis. Need to take out the interior and remove the fascia and fenders to strip out all the excess junk in there as well. Start putting on all the suspension stuff from SPLparts. Hopefully the weather is nice tomorrow. I'm taking the day off to do some personal stuff and work on the car.
2-8-2006
Bah! Sitting in a hotel room in Norfolk VA tonight for a meeting with the Army tomorrow. Meanwhile the wife says another heavy box from SPLparts showed up. I'll start spilling the beans on what Kuah is supplying probably after this weekend when I get a chance to actually install some stuff. I got my BikiROM the other day too. It's backburner for me, so don't email asking about it. I need to get the 300 Degree fuel rails installed on my street car ASAP so I can start selling them (still being evaluated)... so I don't want to get into the wonderful world of BikiROM programming just yet since I'm going to do the initial work with my streetcar before dumping it into my racecar (my ECU from my street car will go in the racecar for now). I'm getting Coz @ Concept Z Performance on board, and Scott @ Smith Concepts (I hope I've got that right! I can't find any propaganda from him for his venture in front of me) as well. Thanks guys! I went to Sandpaper of Texas and talked to my buddy Steve about how to fix my white looking aluminum... ended up buying a 50lb bag of #8 shot glass bead. I hadn't untaped the parts yet because I knew something was screwed. So it was easy to reshoot them. The glass bead is softer and 'shot peens' the surface more instead of being abrasive. My alloy bits are much much shinier then they were the day before now! This thing is going to be really clean looking once it's done. On the valve front, I discovered Nissan still sells the valves with 30 on them... but I'm not sure what they go on, maybe the NA? So it stands to reason what I said earlier is incorrect. If it's got a 30 on the valve face, it's not necessarily a 'soft' valve. Just part of a lot were bad I guess.
2-06-2006
Did some research on my valves. It appears these heads have the 'soft' valve problem. They are marked with 30 on the face instead of EG, which I'm lead to believe indicates that all 12 intake valves might be suspect over time. So I'm just going to replace them all. I'm trying to learn about lapping valves. There's a lot of info about actually lapping, but I really haven't found much about how to know when you're done. I've been applying sharpie and looking for high spots. Everything I've read is like you just lap each one for a couple seconds and you're done. I don't get it. I found a post on tt.NET by Ash where he had some crappy looking valves from a set of heads that looked exactly like what I have. So I talked to him about it. I've wasted so much time on this, but it's super critical because I don't want to tear the engine all the way back out just to mess with a leaky valve. Ash offered part of a solution which is to bolt on the head and do a leak down test. I went and got 5 of the 9 valves I needed from Courtesy today (cleaned out their stock) so I can at least get 1 head done. I also hit up Summit for a real leak down tester. I've got a ghetto rig I put together, but I've been eyeballing the Summit one for awhile now. Also bought a catch can ala Woody's for my rad overflow. I sawed up that older CAS just to see what was inside. I'm not really sure how people rebuild those things now. The shafts are pressed together under thermal difference (shaft is frozen, bearing is room temp, etc) and I really can't figure out how to get the damn thing apart without destroying it. I used a cutoff wheel and just sliced the holy hell out of the front face cover of the old CAS. Finally cut through the retaining strap on the back of the forward bearing and punched the whole shaft/sensor assembly from the front cover. Now I really don't know what to do with the damn thing. There's nothing to grab ahold of to get the bearings off. I guess I'll use the cutoff wheel and just cut the bearing off, races & all. But once I get that done, I have no idea how I'm going to dismantle the '95 CAS I got w/o destroying it in the process. Fun! This week I've got another huge presentation to pitch for work, so time is limited. I hope to get 1 head done up and pressure checked, maybe mess with that PS pump to see if it will draw fluid or not. Got a set of OEM turbo cores from Guapo, those will be going to Forced Performance here in McKinney this week. Considering the cost of everything else I've got going on in this project right now and what my immediate goals are for the car, I'm just going to get a simple OEM rebuild. My street car does 380RWHP on stockers... good enough for my racing needs at the moment. Guapo also got a couple flywheels resurfaced for me while working on a client's car that needed one done as well. NiXit & I are still discussing a proper PCV setup (not just a vent, but a circulation system) that doesn't bleed oil everywhere. Boost pressure sure makes it a mess.
1-30-2006
Heads went to Day and came back. Everything seems OK. I'm going to replace three intake valves anyway, they appear to be ground. I'd rather spend the measly amount to buy new ones. New seals are in and I'll work up a TECH page on performing a simple rebuild on a head (how to save a ton of money at the machine shop). I've had photos and notes for years, just need to get it done. The short block has the oil pan, water tube, water pump, transmission brackets and one of the heads on it, so it's getting closer to being a long block. I checked all 24 of the lifters and swapped out some replacements I had on the shelf where required. Not all of the ones that came out were 'supple'. I spent the afternoon Saturday media blasting the aluminum bits and Polane painting some of the black bits to clean up the engine bay a little bit. I wish I had used a larger diameter bead. The plenum is almost white/gray instead of silver. Hopefully when the alloy ages and oxidizes a little some gleam will come back to it. Guapo and I are going to take a stab at the CAS sensor since he has a 12ton press now. I'm told it takes a 20, but I'd think the CAS housing would at least yield at those sort of loads. I'm thinking a cutoff wheel is going to do most of my work instead. My ECU tech has been let out of the bag by the person that introduced me to it (NiXit). Bikirom will be my new ECU toy. Talked to the guy that's doing the dev on it and mine shipped today. I've discovered I have a TT PS pump in one of my boxes, so I'll tear that apart shortly to see if it can be made into a cooler pump. Problem is I don't know if it will draw fluid or not. As a PS pump, the reservoir is above the pump. In my application it will be below. So this might hit the crapper before we even start. I guess I'll run some bench tests with a drill motor and some hose or something before bothering with the installation in the car. I also discovered I have a NA PS reservoir, so that makes life a little easier. I think I'll try out one of the NAPA PS lines.. Finally, here's the first bit of documentation from Z-Lab: VG30DE(TT) bearing selection FAQ.
1-23-2006
Got the short block back from Day. Looks really good. We had to bore it to .5mm over. I went into my parts pile to find a new TT oil pan, TT pickup, TT? oil pump, an older CAS, an older TT PS pump, and some other misc parts. The original oil pan had a hole in it I didn't feel like welding when I can just replace it. I bought a junk new style CAS from whitepearlz on tt.NET to match my '95 EFI harness so I need to rebuild it. I've done some research and found Doctor C on tt.NET who has done it and has some recollection of the process. Looks like I big mess to me. Fun! The TT PS pump is going to be fun as well. I'm scrapping HICAS and going with the SPLparts eliminator bar, so I can run the NA PS pump. From what I understand the TT pump is really 2 separate pumps in one housing. So I'll take it apart to make sure there is no fluid sharing from the front to the rear of the pump. If there's not, the rear of the pump will be used to cycle fluid from the diff & tranny to a central cooler up front and back to the gearboxes. RSR on tt.NET was talking about adding diff coolers and someone posted info about the euro cars having an OEM cooler. I started talking to RSR about it and we came to the same conclusion that we need another pump for the cooler circuit and that pump might as well be something that's already 'parasitic' to the OEM car. I bought a '95 ECU from Shawn @ Power Supply Racing to run some new ECU technology in. I'll check it out on my '95 street Z and get back with more info once I'm neck deep in making a tuning mess. I also got a slightly used Stillen intake, a set of Wilwood J pads and a set of Hawk Blue pads for the rear from Neurozurgeon.
1-15-2006
A couple of sponsors are now on board with Z-Lab, SPLparts.com & Courtesyparts.com. Thank you for your support! SPLparts is supplying a lot of the suspension components, and some other misc. odds & ends I needed, and Courtesyparts is supplying OEM parts for the engine rebuild. The first documentation for Z-Lab will be out shortly once I get the shortblock back from Day Custom Engines early next week. I've had a page half completed on selecting OEM bearing grades based on stamps in the castings. Just need to wrap it up & get it published after I get some photos taken. I'll be working on the heads this week and I've got a page partially completed for assy of the valve train. I'll finish it up as well. Once I get into the engine build I'll be working through Greg's engine rebuild page to make sure it's got everything it needs... it got published a little prematurely but it's probably 98% complete.
12-27-2005
Nice weather here in Texas, so I spend some time with the car today. Clipped out the EFI harness & dug out other unnecessary stuff from underhood. Borrowed a pressure washer and started cleaning the engine bay. Looks much better now then in the 'as purchased' pictures. I also had the first setback of Z-Lab today, but only a minor one... Both of the 'good' blocks I have are pitted/scored and will require boring. My first request for specific sponsor help is for a set of overbore pistons. I'm not sure what John @ Day Custom Engine is going to ask for size-wise, he's only seen one of the blocks, I just dismantled the longblock that came with the car today and it's lightly scored. It's a good and bad thing, I was hoping to just roll stock blocked out of the gate and come back later to build up the second block. Now I'll have a minorly built shortblock. I'll come back later and deal with heads/conrods/etc. when there's a problem, or money is allocated for it as part of the program.
12-23-2005
Dropped off the extra shortblock I have at Day Custom Engines in Richardson. John will inspect it and let me know what I need to buy for it early next week.
Photos ss Purchased